In the previous post, we found that in a WinRM & HTTPs deployment, if a certificate is allowed to expire WinRM will not notice a new certificate for the purposes of allowing connections using Enter-PsSession -UseSSL.
However, in the comments of that post, Sandeep of Hakabo.com mentioned that he’d actually observed WinRM continuing to work after a cert renewal takes place, even though Microsoft best practice / recommendations state that the end-user needs to script around updating the listener. Check out his post on PowerShell Remoting over SSL for more on his findings.
Clearly, a test was in order.
Setting the stage
First, we needed a good way to test cert renewal. According to this article from Microsoft, the average Windows workstation will attempt to look for new certs and renew eligible certs once every eight hours.
To accurately test for what happens when a cert renews, I needed to worry about either lining up a cert renewal to the automatic period, or find a way to trigger a renewal manually.
I found that you can use the certutil -pulse command to manually trigger a renewal attempt, which uses the same mechanism which the Windows Certificate Services Agent uses.
For this test, I modified my previous template and now set an eight hour lifespan, with a two hour renewal period.
To handle cert renewal and make sure one happened successfully, I wrote this PowerShell one-liner to sit and wait and then try to pulse for certs once an hour.
while ($true){
"$(get-date | select -expand DateTime) pulsing the cert store"|
    tee -append C:\temp\Winrm.log
start-sleep (60*60)
}
Now, I wanted a good way to capture certificate changes, so first I set about capturing the thumbprint of the currently valid cert, since this would be changing while my test ran. Since I only had one cert, I simply grabbed the ThumbPrint value from the only cert issued to this machine. I embedded this also within my log file output.
And finally, I also needed to see which cert thumbprint WinRM was presenting, or thought it was presenting. These kinds of settings are stored within the wsman: PSDrive, under listener the HTTPS listener. I parsed out this value (your listener name will be different, so remember to change this if you use this code).
</pre>
<pre>get-item WSMan:\localhost\Listener\Listener_1305953032\CertificateThumbprint |</pre>
<pre>   select -expand Value
Combing all of these diagnostics, I got this as the result, which echoes out to a file like this.
while ($true){
 "$(get-date | select -expand DateTime) pulsing the cert store"| tee -append C:\temp\Winrm.log ;
"--current valid thumbprint $(get-childitem Cert:\LocalMachine\My | ? Notafter -ne '9/8/2017 4:48:40 PM' | select -ExpandProperty ThumbPrint)"| tee -append C:\temp\Winrm.log ;
"--current WSman thumbprint $((get-item WSMan:\localhost\Listener\Listener_1305953032\CertificateThumbprint | select -expand Value) -replace ' ')" | tee -append C:\temp\Winrm.log ;
"---pausing for one hour"
start-sleep (60*60)
}
Finally, I launched a PsSession from a remote PC, and had that session also echoing out to a log file twice an hour.
while ($true){"currently connected at $(get-date | select -expand DateTime)">>c:\temp\winrm.log;
start-sleep (60*60)}
So the log file looks like this when both channels are dumping into the same file.
What happened?
When I came back the next morning, my whole desk was covered in ectoplasm!! Eww! No, not really. But I will still stunned!
The PSSessions were still open. Even though the certificate renewed overnight! I could validate this by checking the output in the log files.
This is kind of a complex graphic. At the top, you’ll see a snippet from my Certificate Authority, showing that a new cert was issued at 6:56 PM.
On the left, you see the log file from that time, echoing out to the screen with no interruption. Then, on the right, you’ll see the actual output from the console which was connected…no disruption.
If there were a disruption, we would see the above Warning text, stating that the connection was broken and will be retried for the next four minutes
So, that was all pretty interesting and conclusive proof that WinRM somehow is able to handle a cert renewing, and also not drop any current connections.
This is where things get weird
the clinging mist issuing forth from the derelict disk drive wrapped around the intrepid nerd’s fingertips, threatening to chill his hands and adversely impact his APM, causing a huge drop in his DKP for this raid
-Unknown author, from the Nerdinomicon
The reports we saw from Sandeep and one other person said that WinRM would either still list the old cert in the UI, or even still USE the old cert. Previous tests showed that if an invalid cert is presented, WinRM will not work. So now we took a look at the log file output.
This was puzzling! I can see that a new cert was issued based on the changed thumbprint, but if my log could be tested, it looked like WinRM was still referencing the old cert!
Now I opened the cert itself in the MMC and compared it to the results within the WSMan settings.
So, the cert renewed and the PSSession remained open, but WSMan still stubbornly reported that it was using the previous thumbprint!
But did you reboot it / restart WinRm/ etc?
Yes. I tried everything, and no matter what, WinRM continued to reference the old certificate thumbprint. However, WinRM SSL connections still worked, so clearly some mechanism was correctly finding the new Cert and using that! The only way to get WinRM to reflect the new cert was to delete the old listener and recreate it, using winrm qc -transport:https all over again.
How is it even working?
I’m not sure, guys, but I did open an issue with Microsoft on the matter, here on Github.
Tests have been conducted from Server 2012 R2 machines running WMF 5.0 to other machines of the same configuration. I’m conducting tests now with 2008 R2 machines ot see if we find the same behaviour.
This post is part of the Learning DSC Series here on FoxDeploy.com. To see the other articles, click the banner above!
For years now, people have been asking for a DSC GUI tool. Most prominently me, I’ve been asking for it for a longggg time!
My main problem with DSC today is that there is no tooling out there to help me easily click through creating my DSC Configurations, other than a text editor. For a while there, I was hoping that one of the tools like Chef or Puppet would provide the UX I wanted, to click my way through making a DSC Configuration for my machines…but after checking them out, I didn’t find anything to do what I wanted.
I’ve made a lot of PowerShell modules before but none of my projects have ever been as ambitious as this. I welcome help! If you want to rewrite it all in C#, go for it. If you see something silly or slow that I did, fix it. Send me Pull Requests and I’ll merge them. Register issues if you find something doesn’t work.
I want help with this!
Where will we go from here
This project has been a work-in-progress since the MVP Summit last year, when I tried to get MS to make this UI, and they told me to do it on my own! So this is version 1.0. Here’s the planned features for somewhere down the road.
Version
Feature
Completed
1.0
Released!
✔️
1.1
Ability to enact the configuration on your machine
This post is part of the Learning GUI Toolmaking Series, here on FoxDeploy. Click the banner to return to the series jump page!
Where we left off
Thanks for joining us again! Previously in this series, we learned all about writing fully-fledged applications, in Posts 1, 2and 3. Then, we learned some techniques to keeping our apps responsive in Post 4.
In this post, I’ll walk you through my GUI design process, and share how that actually worked as I sought to create my newest tool.
Along the way, I’ll call out a few really confusing bugs that I worked through in creating this tool, and explain what went wrong. In particular, I ran into quite a snag when trying to programmatically create event handlers in code when trying to use $psitem or $_. This lead to many conversations which introduced me to a powerful solution: the $this variable.
Think something sort of like the Group Policy Management Console, for your DSC Configurations. But we’ll get back to this in a few minutes.
My GUI Design Process
Here’s my general process for designing a front-end:
Create the elevator pitch (Why does this need to exist?)
Draw out a rough design
Make it work in code
Add feature by feature to the front end
Release
Iterate
It all started with me taking a trip to Microsoft last year for the MVP Summit. I’d been kicking around my elevator pitch idea for a while now, and was waiting to spring it on an unwary Microsoft Employee, hoping to con them into making it for me:
Here’s my elevator pitch
To drive adoption of DSC, we need some tooling. First, we need a GUI which lists all the DSC resources on a machine and provides a Group Policy Management Console like experience for making DSC configs.
We want to make DSC easier to work with, so its not all native text.
I decided to spring this on Hemanth Manawar of the PowerShell team, since I had him captive in a room. He listened, looked at my sketches, and then said basically this:
‘You’re right, someone should make this…why not you?’
Thanks guys. thanks
So I got started doing it on my own. With step one of the design process –elevator pitch– out of the way, I moved on to the next phase.
Time to draw a Rough Draft of the UX
This is the actual sketch I drew on my Surface to show Hemant while in Redmond for the 2015 MVP Summit. It felt so right, drawing on my Windows 10 tablet in OneNote, with guys from Microsoft…it was just a cool moment of Kool-Aid Drinking. In that moment, my very blood was blue, if not my badge.
‘oh, now I know why you didn’t pursue a career in art’
What will be immediately apparent is that I lack both handwriting and drawing skills…but this is at least a start. Here’s the second design document, where I tried to explain how the user will actually use it.
Stepping through the design, a list of all DSC resources on the left. Clicking a Resource name adds a new tab to the ‘config design’ section of the app, in which a user would have radio buttons for Present/Absent, Comboboxes for multiple choice, and textboxes for text input. On the bottom, the current ‘sum’ of all tabs would be displayed, a working DSC configuration.
Finally, an Export button to generate a .mof or Apply to apply the DSC resource locally. We marked the Apply button as a v 2.0 feature, wanting to get some working code out the door for community feedback.
With the elevator pitch and rough draft drawing completed, it was now time to actually begin coding.
Making it work in code
The code part of this is simple. Running Get-DSCResource returns a list of all the resources. If I grabbed just the name property, I’d have a list of the names of all resources. If I made one checkbox for each, I’d be set.
Now, to pipe this output over to Get-DSCResource -Syntax, which gives me the fields for each setting available in the Resource.
I started with a brand new WPF application in Visual Studio, there were a lot of different panel options to choose with WPF, here’s a super helpful site explaining them. I used a combination of them.
Living on the Grid
I started with a grid layout because I knew I wanted my app to be able to scale as the user resized it, and I knew I needed two columns, one for my DSC Resource Names, and the other for the big Tab control.
You do this by adding in a Grid definition for either rows, columns or both. Then when you add containers inside of the grid, simply specify which Grid area you want them to appear within.
Since I want my DSC Resources to appear on the left side, I’ll add a GroupBox with the header of ‘Resources’ and a button on the left side. In the GroupBox, I simply add Grid.Column="0" to bind this container to the that Column.
Next, I needed a way to create new checkboxes when my UI loads. I wanted it to run Get-DSCResource and grab the name of all the resources on my machine. I came up with this structure
This seemed to work just fine, and gave me this nice looking UI.
However, when I clicked the checkbox on the side, instead of getting tabs for each resource, I instead…well, just look!
Only the very last item added to the list was getting added. That seemed like quite a clue…
Here there be dragons
So I ran into a HELL of a snag at this point. I spent literally a week on this problem, before scripting superstar and general cool-guy Dave Wyatt came to save my ass.
Why was this happening? To quote Dave:
The problem is that when your handler is evaluated, $resource no longer refers to the same object that it did inside the loop. You should be able to refer to $this.Name instead of $resource.Name to fix the problem, if I remember correctly.
What’s $this?
$This
In a script block that defines a script property or script method, the
$This variable refers to the object that is being extended.
I’d never encountered this before but it was precisely the tool for the job. I simply swapped out the code like so:
$TabName = $this.Name
And the issue was resolved. Now when I clicked a checkbox, it drew a new tab containing the name of the resource.
Loading the resource settings into the tab
When we run Get-DSCResource -Syntax, PowerShell gives us the available settings for that resource. To get this going as a POC, I decided it would be OK if the first release simply presented the information in text form to the user.
So, I added a text box to fill up the whole of the tab. First, when the box is checked, we create a new TabItem, calling it $tab and then we set some properties for it.
Next, because I want to make a TextBox fill up this whole $tab, we make a new TextBox and define some properties for it as well, including, notably:
Any DSC Configuration should have a name, so I wanted to add a new row to contain a label, a TextBox for the Configuration Name, a button to Export the Config, and finally a button to clear everything. I also knew I would need another row to contain my big compiled DSC configuration too, so I added another row for that.
I also wanted my user to be able to resize the UI using sliders, so I added some GridSplitters as well. Below you’ll see the GridSplitters on either side of another dock panel, which is set to appear below the rest of the UI, based on the Grid.Row property.
Finally, to add the resultant textbox. The only thing out of the ordinary here is that I knew our DSC Configuration would be long, and didn’t want the UI to resize when the configuration loaded, so I added a ScrollViewer, which is just a wrapper class to add scrollbars.
We also added a status bar to the very bottom, and with these changes in place, here is our current UI.
Compiling all tabs into one DSC Config
When a user makes changes to their DSC tabs, I want the Resultant Set of Configuration (RSOC!) to appear below in the textbox. This ended up being very simple, we only need to modify the code that creates the Textbox, and register another event listener for it, like so:
This single change means that whenever the textChanged event fires off for any textbox, the event handler will trigger and recompile the .Text property of all tabs. Nifty!
Wiring up the Clear and Export Buttons
The final step is to allow the user to reset the UI to starting condition, by adding a event listener to my Clear Button.
$WPFClearv2.Add_Click({
$WPFResources.Children | ? Name -ne Clear | % {$_.IsChecked = $False}
$WPFDSCBox.Text= "Compiled Resource will appear here"
})
And finally add some code to the export button, so that it makes a .mof file. Here I used the System.windows.Forms.FolderBrowserDialog class to display a folder picker, and I access the value the user chooses, which persists once the picker is closed as .SelectedPath.
Last of all, I wanted a way to display a prompt to the user that the file was exported correctly.
What’s next?
This is what I’ve been able to complete so far, and it WORKS! If you’d like to, feel free to pitch in and help me out, the project is available here.
Here are my short-term design goals for the project from here on:
Develop new UX to change from text driven to forms based UI with buttons, forms, comboboxes and radios
Add support for multiple settings within one configuration type (currently you have to copy and paste, if you want to add multiple File configurations, for instance.
Speed up execution by heavily leveraging runspaces (and do a better job of it too!)
Last week, I was able to attend my first big IT Conference, a dream of mine since I first got into IT almost ten years ago. I got to attend Microsoft Ignite!
IT WAS AWESOME!
In this post, I’ll recap some of my experiences attending…and being able to speak there as well!
On the value of Ignite
Ignite is Microsoft’s gigantic combination of TechEd and MMS, a far-reaching summit covering all of Microsoft’s technology stack, from devices to SQL, asp.net to Azure, everything is here.
It is HUGE. Just overwhelmingly big. You simply cannot attend every session, and you’ll probably find yourself triple or quadruple booked for sessions. Keep in mind that conferences like Ignite commonly take place in massive convention centers like the Georgia World Congress Center. Actually, while I’m talking about it:
The GWCC
The Georgia World Congress Center is absolutely unfathomably big. It is the fourth biggest convention center in the United States. If you’re in Hall A, the walk to Hall C will easily take you twenty minutes or more. And the session might be full by the time that you get there.
Enter the Ignite app. One AWESOME feature of this app is the ability to livestream any session live from your app. Very convenient. I used this a lot, as my feet got progressively more sore and I became lazier and lazier. There is also an area full of comfortable couches, bean bags, tables and chairs called the ‘Hangout’. In this area, you can chat and have snacks and watch sessions on a colossal, wall filling screens.
the hangout, great when you’re feeling lazy or want to socialize
I spent a lot of time here!
The Expo Hall
Ignite features an absolutely amazing and gigantic vendor hall. Something like…a lot of Vendors were here.
Actually, for a Windows / Microsoft guy, the Expo hall is amazing. I instantly recognized the vast majority of vendor names and had good conversations with the vendors, or learned of cool new features, like the v3.0 release of SquaredUp, which now works on the HoloLens!
Tried on the Hololens! Verdict : definitely try one on!
I also got to try on the HTC Vive, which blew my socks off. As one of the 10% of people who experience SIM Sickness, which makes me very ill if I have a bad VR session, I was afraid that I’d never be able to play VR at all.
However, those fears were all alleviated when I put on the Vive. Fully immersive, head and motion tracking VR meant that I could move around as I wanted and my inner ear accepted the experience as reality. AWESOME! I learned that room scale VR is a must for me.
Roughly half of the floor space of the expo hall was reserved for Microsoft, who filled the space with dozens of booths which had high-tech displays and whiteboards to help diagram solutions. If you need help with a Microsoft expert for ANY issue, you can find that answer here on the Expo Hall floor.
For organizations with pressing IT challenges who want to get a lot of highly qualified answers, the expo hall alone is worth the price of admission to Ignite.
But people don’t go to the hall for the swag or vendors..they go for the AMAZING SESSIONS!
My favorite sessions
There were SO many incredibly good sessions at Ignite. I made this YouTube playlist (seems Ignite is more hosted on YouTube this year rather than on Channel 9).
To draw attention to my favorites of these
System Center 2016 – What’s new : a great one hour session cataloging all of the nice new features of mostly SCOM, which I need for my customers
The first time I taught a class of PowerShell, I spent a month working on my course and practicing for it. I found out in September of that year that I’d be doing this training in three months.
I pretty much have no memory of those months, other than laying down in bed with my heart pounding. I lost so much sleep and felt queasy all the time, so I actually lost weight!
Just attending a conference like Ignite had always been a dream of mine, to meet those people who helped me so much, and thank them or get my questions answered. It never even occurred to me that I might one day be giving a talk at Ignite, and I definitely never expected to have more than a few people sign up for it.
I was humbled greatly to see the numbers of people sign up and knew I had to focus and do my best. I spent hours and hours listening to great public speakers like Simon Peeriman, Don Jones and Jason Helmick, and listened over and over to James Whitaker.
I practiced my full session with demoes more than ten times all the way through, working on whittling the content down and practicing my transitions.
I used that fear to motivate me, and on the day of the talk, woke up full of energy and no worries.
The crowd packed in! But for my first session I had no mic so I had to yell! Very, very tough.
People cramming in to try and hear me yell over the very, very loud Nutanic booth behind me.
For my second session of the day, I had a mic! Life was much better.
On being recorded
One of my dreams was to have my session from Ignite be recorded, kind of like proof of having been there. I never expected to be recorded in a studio though! Seeing the massive Ignite studio, which took up a huge section of Hall C, in the Hangout section, I immediately felt my heart start pounding again.
My thoughts ” boy I hope no one comes!”
The morning of, I met the awesome Jeremy Chapman, who makes the wonderful Microsoft Mechanics videos. Then I got miced up and ready. I was hoping that, with this being the last day of Ignite, crowds wouldn’t be too big.
NOPE.
All in all, I feel good about how my session went. I think I’d even like to speak at more conferences! Once the nerves died down, I found speaking to be very, very exciting and rewarding. I know that at the end of the day, I did my absolute best to make this the highest quality twenty minute introduction to PowerShell that I could make it.
If you’re an SCCM Administrator you’ve likely heard of InTune and might be wondering when to use it.
In this post, we’ll cover how SCCM and Intune are able to manage Windows 10 full desktop computers (including laptops and Windows tablets like the Surface or Surface book.)
If instead you’re wondering about managing the Surface RT, lol, enjoy your metro cutting board.
Best use for a Surface RT in 2016
To understand where InTune really shines, let’s think of where SCCM works best:
known and defined network infrastructure
well connected end-point devices (less of an issue today)
standardized hardware models
standardized, company owned hardware
Active Directory Domain (all SCCM servers must be domain members)
Managed machines are either domain joined, or need certificates (certs =PKI =Even more infrastructure and configuration)
Wonderfully powerful imaging capabilities
It becomes pretty obvious, SCCM is for the big enterprise, which its also expensive and has some serious requirements.
Now, let’s contrast this to the management story we have from Intune:
No requirement for local hardware or infrastructure
No on premises Active Directory requirement
Works very well with Azure AD
Works great with user owned and heterogeneous devices
Literally zero imaging options
For the rest of this post, I’ll list the big capabilities of an Enterprise Client Management tool and contrast how each of these tools perform at that task, we’ll cover:
Enrollment
Deploying Software
Delivering Updates
Imaging / Provisioning
Before we dig in, I’d like to call out one SCCM and Intune configuration, then I’ll immediately throw it out and never mention it again. You can integrate SCCM with Intune, this makes your Intune managed mobile devices like cell phones and iPads (but not Windows desktop devices) appear in the SCCM console.
This elevates your SCCM to the single page of glass to manage all systems in the environment.
K, just wanted to mention that so I can say I covered everything.
One last thing: this post is going to talk about Provisioning Packages a lot. Never heard of them? Here is some additional reading for you.
Management Options
Management, it’s the whole reason we bother with tools like Group Policy, Intune and SCCM. At the end of the day, we want to standardize our machines and make it easier for our employees to get work done. Let us never forget that these end-users are really the reason we’re here in the first place.
It’s like a bakery. At a certain scale, they need delivery trucks, and probably mechanics. You might work as a bakery mechanic and have plans for these trucks. They’re gonna get painted, they’ll get some new tires, and you’ll overhaul the engines. So you decide to take all of the delivery trucks out of commission for a week to work on them. Great, now you’ve got the prettiest trucks in the business, but the company has lost all of their customers because they failed to make deliveries on time!
Never be a bakery mechanic. Wait, what was I talking about again. Oh yeah, managing machines and how it differs from Intune and SCCM. It’s been like five hundred words again so I guess I need another graphic.
SCCM. ConfigMgr manages machines via a Client which must be present on all managed machines. Most machines recieve the sccm client while imaging. If not, you as the administrator are in charge of deploying the agent and the user never knows most of the time. It’s either pushed as a Windows Update through WSUS, or remotely installed automatically or manually from the SCCM console.
Intune when it comes to managing Windows 10 devices with Intune, you have two routes for management.
First, Intune offers it’s own an client, which is an MSI, much like SCCM. This agent is deployed either via GPO, by sending users to portal.manage.microsoft.com, or you can download the msi from Intune, and either instruct users to install it or push it with whatever software distribution tool you have.
Windows 10 also introduced the capability to manage Windows machines via a built-in Mobile Device Management (MDM) client. This means no visible agent to the end user. Awesome!
However, the management option you choose, Agent based or MDM, determines what you can manage.
Let’s break it down further to help you determine which route is for you:
Intune Agent
you may be thinking ‘oh, I know SCCM so this Intune agent must be the one-true-management option, right?’
Wrong. There are serious serious limitations to managing a machine via the Intune Agent. In fact, for most scenarios, you will not want to go this route.
The Intune agent can manage the basics: software distribution, Firewall enabled and exceptions, turn on Windows Defender (this week’s name for Windows built in anti-virus), and so on. You also have limited control over Windows updates for PCs as well.
You cannot enforce security settings like a screen lock or time out.
MDM Management
Managing our Windows desktops like they’re a mobile a device, this is the new hot option available to us. Since Windows natively includes an MDM agent, we’re now able to provision security like we never could before. Think of the types of security you can enforce on a mobile phone with Exchange ActiveSync or AirWatch, etc?
When managing your Windows devices like they’re a mobile phone, you can control pretty much everything. Here is a complete list of all features currently manageable with InTune MDM enrollment. It’s almost all encompassing.
Imaging / Provisioning
Here lies the single greatest difference between managing machines with SCCM versus Intune, how machines are imaged or provisioned to function with your workplace.
Imaging in SCCM
This is very well traveled ground, SCCM is simply the single most powerful and configurable system available to administrators to build and deliver a standardized image to hardware either via PXE boot or bootable thumbdrive. If you know SCCM, you know how to do this, nothing has changed.
Imaging with InTune
This is where things become VERY interesting and we have to start getting crafty, because…
Intune cannot image PCs. Fullstop.
Yep. You are not going to be deploying images with InTune. But you kind of don’t really need to.
InTune is all about turning around our assumptions of what managing a machine truly means and requires. If we think of why we typically image machines, it’s because we want to deliver a standard set of software, ensure basic settings compliance, make sure they’re getting updates and provide a standardized experience to our users, we may also want to make sure that they’re running BitLocker and are on an appropriate and licensed version of Windows.
However, many companies deploying InTune may not have standardized hardware (if you do, I have something for you at the bottom of this section), or the users might be bringing in their own hardware with a BYOD model. In this case, the machine is already running Windows, so instead we just need to find a way to manage those core usage scenarios.
We do all of this via Provisioning Packages. You create one using WICD (Windows Image Configuration Designer), and it outputs a small .ppkg file. Users double-click it and it allows the package to make a LOT of Windows changes. You can:
Change the edition of Windows, bringing them from Home to Enterprise, for instance, which is required for BitLocker
Enroll the machines silently with InTune
That’s really all we need to do. With the version of Windows changed, we can now do everything else, from deploying software and updates, enforcing compliance and security settings, and even locking things down with Bitlocker, all using standard policies from the InTune console.
For many even enterprise management situations, this is truly ‘good enough management’ and greatly reduces our work as admins.
“But mah standard image!” Worry not! If you must deploy a standard image but need to manage your machines with Intune, there is an answer for you.
I’m engaged in a project right now with a large food-services company. We’ve built a standard image ISO with all the common software, and then created a Provisioning Package and baked it into the image. We can then deploy this out to WDS for PXE booting, or deploy the image to our hardware vendor who will bake it into the machines before drop shipping them to our offices in the field.
In this manner, we are able to deploy a standard Golden Image to our machines, but still ensure management with them through InTune. Covers all of our needs without the expense of SCCM.
Deploying Software
SCCM provides very, very deep logging and a generally powerful and easy to use experience to deploy software. There are guides and guides galore to cover this topic.
Intune provides a VERY minimalized set of options to managing software. You either deploy a .msi or setup.exe with a limited set of install switches, provide a local path for the files and they get uploaded to Intune. From there on, troubleshooting app installs is admittedly much harder from Intune than from SCCM. With SCCM, you have extremely verbose, very detailed logging.
Not so with Intune. You’ll find some logging within this log file:
%ProgramFiles%\Microsoft\OnlineManagement\Logs
And that’s about it. If you’re using a different MDM Platform, like Air-Watch….good luck. Beyond these warnings, I’m really not going into to depth on this topic because it is covered in great detail on this channel 9 video.
My core take-away is that while you can push software with Intune or other MDM management tools, it’s much harder to do than with SCCM alone. Keep this in mind and make sure you’ve got an absolutely bullet-proof package before trying to push it with Intune, to minimize tears.
Failure to test your package before using Intune will leave you feeling out of control
Delivering Updates
With SCCM, we can both control the Update Source and Frequency of Updates, as well as deliver them from an internal location. We use the SCCM console to manage which updates are made available to users. When we approve updates in SCCM, they’re approved within SCCM’s own instance of WSUS and delivered that way.
Conversely, we can control both update source (whether via an internal update source (WSUS) or through Windows Update over the web) and frequency for devices with InTune, but if we want to manage which updates devices receive, we have to manage them manually using our own WSUS instance.
This will become less of an issue, as there are no more individual updates released anymore, as of September 2016.
Conclusion : who is Intune really for?
Microsoft has been the uncontested champion of enterprise and the workplace for the last two decades. However, things change. Schools are moving more and more to Google Apps, using GMail addresses for employees and the Google Apps suite of productivity tools for faculty and staff, and deploying comodity hardware Chromebooks to students. This has been the trend for almost ten years now.
These students grow up with an Android or iPhone, get a Chromebook or Macbook for school, and then go through college and graduate without ever touching many Windows machines. It’s pretty reasonable to assume that they’ll then enter the workforce or start their own companies after that.
And when they do, they are NOT going to think Microsoft as their first choice. They won’t even be familiar with Windows Domains, Roaming Profiles, any of that.
For this new class of worker and this new workplace, we have Intune. Sure, it’s not as fully fledged as SCCM, but it doesn’t need to be, since there probably won’t be standardized hardware anyway. These machines will probably be Azure AD Workplace Joined, which isn’t as deep as Group Policy, but it handles most of the big asks without breaking a sweat.
Intune is the story of ‘good-enough’ administration.
It’s not GPO, SCCM or even MDT but it doesn’t have to be.
PowerShell has been mostly complete for you and me, the ops guys, for a while now. But for Developers, important features were missing.
One of those features were Classes, a important development concept which probably feels a bit foreign to a lot of my readers. For me, I’d been struggling with classes for a long time. Ever since Middle School. #DadJokeLol.
In this post, I’ll cover my own journey from WhatIsGoingOnDog to ‘Huh, I might have something that resembles a clue now’.
I’ll cover what Classes are, why you might want to use them, and finally show a real-world example.
What the heck are Classes?
If you’ve been scripting for a while, you’re probably very accustomed to making CustomObjects. For instance, I make Objects ALL the file that contain a subset of properties from a file. I’ll commonly select a File’s Name, convert it’s size into KB, and then display the LastWriteTime in days.
Why, because I want to, that’s why! It normally looks like this.
#code go here!

$file = Get-Item R:\Dan_Hibiki.jpg

##Using Calculated Properties
$file | Select-Object Name, @{Label='Size(KB)';Expression={[int]($_.Length / 1kb)}},`
@{Label='Age';Expression={[int]((get-date)-($_.LastWriteTime)).Days}}

##Instantiating a custom object
[pscustomobject]@{Name=$file.Name
'Size(KB)'=[int]($file.Length / 1kb)
'Age'=[int]((get-date)-($file.LastWriteTime)).Days
}

Name Size(KB) Age
---- -------- ---
Dan_Hibiki.jpg 38 1053
This is fine for one off usage in your code, but when you’re building something bigger than a one-liner, bigger even than a function, you can end up having a lot of your code consumed with repetition.
The bad thing about having a lot of repetition in your code is that you don’t just have one spot to make a change…instead, you can end up making the same change over, and over again! This makes it REALLY time-consuming when you realize that you missed a property, or need to add an extra column to your output. A minor tweak to output generates a lot of work effort in cleaning things up.
What problems do they solve?
From an operations / scripting perspective: Classes let us save a template for a custom object. They have other capabilities, true, but for our needs, understanding this use case will make things much easier.
Most of your day to day scripts will not need Classes. In fact, only very complex and advanced modules really make sense as a use cases for Classes. But it’s a good idea to know how to use them, so you’ll be prepared when the opportunity arises.
Where can I use Classes?
Keep this in mind, PowerShell Classes are a v5.0 Feature. If you’re writing scripts that target machines running Server 2003 or Vista, you’ll not be able to use Classes with this syntax we’ll cover here.
Surprise! You’ve been using Classes all along! Kind of.
It’s easy to get started with classes. In fact, you’re probably used to working with them in PowerShell. For instance, if you’ve ever rounded a number in PowerShell, you’ve used the [Math] class, which has many helpful operations available.
Wondering about the double colon there? No, I’m not referring to the delicious chocolatey stuffed Colon candy, either.
Remember kids to get this checked out regularly once you’re in your thirties.
What we’re doing there is calling a Static Method.
Methods: Instance versus Static Methods
Normally when we call methods, we’re used to doing something like this.
$date = Get-Date
$date.AddDays(7)
In this process, we’re calling Get-Date, which instantiates (which makes an instance of) an object of the DateTime class.
As soon as we go from the high level description of the class to an actual object of that class (also called an instance), it get’s its own properties and methods, which pertain to this instance of the class. For this reason, the methods we get from instantiating an instance of a class is referred to as Instance Methods.
Conversely, when a class is loaded into memory, its methods are always available, and they also cannot be changed without reloading the class. They’re immutable, or static, and you don’t need to call an instance of the class to get them. They’re known as Static Methods.
For example, if I want to round a number I just run
[Math]::Round(3.14141,2)
>3.14
I don’t have to make an instance of it first, like this.
#What we won't do
$math = new-object -TypeName System.Math

>new-object : A constructor was not found. Cannot find an appropriate constructor for type System.Math.
This error message of ‘No constructor is telling us that we are not meant to try an make an object out of it. We’re doing it wrong!
Making a FoxFile class
Defining a class is easy! It involves using a new keyword, like Function or Resource. In this case, the keyword is Class. We then splat down some squiggles and we’re done.
Class FoxFile

{

#Values you want it to have (you could allow arrays, int, etc)
[string]$Name
[string]$Size
[string]$Age

#EndOfClass
}
Breaking this down, at the start, we call the keyword of Class to prime PowerShell on how to interpret the following script block. Next, I define the values I want my object to have.
If I run this as it is…I don’t get much out of it.
However, using Tab Expansion, I see that I have a StaticMethod of New() available. For free! If I run it, I get a new FoxFile object, but it doesn’t have anything defined.
PS > [FoxFile]::new()

Name Size Age
---- ---- ---
Not super useful…however because I didn’t add any instructions or bindings to it. Let’s go a little bit deeper.
Getting Fancy, adding a method to my Class
Adding a method is pretty easy. It can be thought of as defining a mini-function within our Class, and it basically looks exactly like a mini-cmdlet. A cmdletlett. Com-omelete. Mmm…omelet.
Going back to our class definition before, all we do is add a few lines of space and add the following:
When we’re working with classes, we’re dealing with the special snow-flake vegetable, $this. In the above, we’re defining what happens when someone calls the new method.
We’ve already defined the properties we want this class to have, so we’re setting them here. We provide for one parameter which we’ll call $file, and then we map the Name property to what’s parsed in.
And that’s pretty much it. You can get very deep with Classes, for instance, I wrote an example, available here, of a VirtualMachine class you could use in Hyper-V, which is capable of creating a new VM. In a lot of use cases, I might instead just write a module with a few PowerShell functions to handle the tasks of many methods for a class, but it’s always good to know how to use the tools in your toolbag.
Resources
One of the greatest things about PowerShell is the incredible community and repository of resources available to us.
Want a deeper dive than this? Checkout some of these resources here:
Let’s face it, guys. There are times that you JUST don’t have access to SCCM, MDT or Kace, and need to deploy a completely automated and silent Windows install without our normal build tools. If this is you, and you deploy systems frequently, you’ve probably spent way too much time looking at screens like this one
Not only does it stink to have to type a user name and password every time, it also slows you down. Admit it, whenever you start a Windows install, you start doing something else, and then an hour later check back and have to reload the whole task in your memory again. It’s a giant waste of time and makes you less productive.
To top it off, there are probably things you always do, like setup user accounts, join a machine to a domain, and set the time zones (we can’t all live in the chosen timezone of Pacific Standard Time).
Previously, making these changes and baking them in to an unattended install meant using the terrible Windows SIM tool, which was horrible. Seriously, no offense meant, but if you had a hand in designing the System Image Manager tool, I’m sure you’re already ashamed. Good, you should be.
Thankfully we now have the Windows Image Configuration Designer (Wicd) which makes this all super easy!
In this post, we’ll walk you through everything you need to do to make a fully silent, unattended Windows Install, along with some useful settings too. We will be installing WICD, which is part of the ADK, and then walk through configuring the following settings:
‘Enable Remote Desktop out of the box’
Set Default Time zone (no west coast time!)
Set Default First User
Silent Install (depends on setting a user account)
Make the computer do a quick virus scan on first boot
Optional – Domain Join
Optional – Add files to the image
Optional – Make Registry Changes on the Image
Setting up WICD
To get access to the awesome WICD tool, you’ll need to have the Windows 10 ADK. I recommend using version 1607, at a minimum (Download Link). When installing the ADK make sure to check the two red boxes shown below, for full features.
If you leave these unchecked, it won’t be WICD good. Make sure to ☑️
If you’re installing the ADK as a prerequisite for SCCM, be sure to check all four boxes shown above, at a minimum.
Next, download you’ll need a copy of your Windows ISO, mount or unzip it. We’ll be looking for this file very soon, E:\Sources\install.wim. Later on, we’ll need to reference additional files from it too, so keep it mounted there till the very end!
Now, open WICD and click ‘Windows image customization’
Don’t see this option? You missed a step earlier! Rerun the ADK install and be sure to check all the boxes listed above!!
Click through the next few pages, specifying a project folder and then selecting ‘Windows Image File’.
50% of my playtime in The Witcher is just trying on outfits. It’s like Fashion Souls all over again…
WICD supports working with Windows Flashable Image files as well, the FPU file format. This is the only option for Win10Iot, but not relevant to what we’re doing here, so select the top option (WIM File)
On the next page, browse to your source ISO, which we mounted earlier. You’re looking for the install.wim file, which will be found at E:\Sources\install.wim.
In the next page, we can import a ProvisioningPackage.ppkg if we have one available. Import it, if you’d like, or continue on if you don’t have one available. Now we should be in this screen. Let’s work through the settings, one by one.
Enable Remote Desktop out of the box
Since I’m going to be deploying this image to my VMs, I want to natively be able to use the Enhanced Virtual Machine Connection feature available on Hyper-V Gen 2.0 VMs running a Windows 8.1 or higher. The only dependency is that the ‘Remote Desktop Service’ must be enabled, so let’s go ahead and enable that.
In the left side of the screen, scroll down to Image Time Settings \ Firewall \ Firewall Groups
We’re going to create a new Firewall Group, titled Remote_desktop. Type this in as the ID up top and click Add. This will add a new node to our configuration on the left hand side of the screen.
Clicking on the left side of the screen shows our available customizations.
Select our group and choose ‘Active = True’, ‘Profile = All’ . Now for one more setting, scroll down to ‘Image Time Settings \ Terminal Services \ Deny TS Connections’
Change this setting to false, and you’re set. Now Enhanced VM Connection will work out of the box for any VMs deployed with this image.
Timezone
We can’t all live in Pacific coast time, and I personally hate seeing the System Clock set to the wrong time. I’ll assume you all live on the ‘Right Coast’ like I do :p
Scroll down to Image Time Settings \ Shell \ TimeZone
One of the more finicky fields, be sure to exactly type your TimeZone name here
You’ll need to properly type your timezone name here. I’ve seen it be VERY finicky, so use this list to make sure you get the desired timezone correct! If you need to customize this based on multiple office locations, you’ll be better off looking at MDT, which can very easily configure this setting dynamically.
New User
In order to silently deploy this image, you must provide at a minimum the default user account. Once we’ve done this, we can proceed to the next step of disabling the OOBE wizard. But first things first, let’s setup a user. Scroll down to Runtime Settings \ Accounts | Users > User Name
Enter the name of this image’s default user
As seen before, this will add a new node with some more configuration options. At a minimum, you must specify a password and which group to stick this user in.
This should be the DEFAULT user. The password you save here can be recovered, so don’t make it your domain-admin password
Finally, choose which group to put this user into.
With this setting completed, we can now disable the install wizard and have a completely silent, unattended install experience.
Enabling Unattended mode
If you scrolled down to this point, make sure you specified a User Account first, otherwise this next setting will not do anything.
To enable unattended mode–truly silent Windows Installs!–we need to hidethe Windows Out Of Box Experience. Do this by scrolling down to Runtime Settings \ OOBE \ Desktop \ Hide OOBE > TRUE.
This setting only works if you create a user account!!
Turn on Windows Defender & auto-update
With these settings out of the way, now I’ll walk through some of my favorite and must-have settings for Windows Images. I absolutely hate connecting to a VM and seeing this icon in the corner.
The red X Windows Defender icon
You’ll see this icon for a lot of reasons, but I normally see it if an AV scan has never run on a machine or if the definitions are too old. It will typically resolve itself within a few hours, but when I’m automating Windows Deployments I almost always have someone connecting to a machine within a few hours, and have to answer support calls.
No more. Scroll down to Runtime \ Policies \ Defender and set the following settings, which will run a QuickScan after Windows Install completes, and tell the definitions to update quickly.
Allow On Access Protection – Yes
RealTimeScanDirection – IncomingFiles
ScheduleQuickScanTime – 5 mins
SignatureUpdateInterval – 8 hours
Join to a domain while imaging
This is a simple setting but you’ll want to be careful that you don’t bake in a Domain Admin level account. You should follow established guides like this one to be sure you’re safely creating a Domain Join Account. Once you’ve done that, scroll down to Runtime Settings \ Account \ Computer Account and specify the following.
Account – Domain\DomainJoinAccount (insert your account name here!)
AccountOU – DestinationOU (Optional)
ComputerName – Want to change the computer name? You can! I use FOX-%RAND:5% to make computers name FOX-AES12 or other random names. (optional)
DomainName – Domain to join
Password – Domain Join Account Password
How to save this as a image
Once you’re satisfied with all of your changes, it’s time to export our settings and get to imaging. Click Create \ Clean Install Media, from the top of the WICD toolbar.
Be sure to chose WIM format, then click next.
WICD has a super cool feature, it can directly create a bootable Windows 10 thumbdrive for you! AWESOME! So if you’re happy building systems this way, go for it! If you’d instead like to make a bootable ISO, select ‘Save to a folder’ instead.
Assuming you choose to save to a folder, provide the path on disk for the files.
Remember to click Build, or you can sit here at this screen for a LONG time!
Click ‘BUILD’ or nothing will happen!!
When this completes, you’ll have a folder like this one, which looks exactly like what you see when you mount a Windows Install disk.
We can now edit the files here on our build directory before we package it up in an image!
Optional: Add files to the image
One thing I like to do on all of my images is include a good log file viewer. If you’d like to add some files to be present on your machines imaged with this WIM, give this a shot.
First, create a directory to mount the file system from the .WIM file. I made mine at C:\Mount.
Next, browse out and find the install.wim we just saved in the last step, mine is in C:\temp\2016LTSBCustom
With this done, we can now browse out to the disk and we’ll see the install.wim file we just created earlier, as it will be expanded out on disk. This is what it’s going to look like when Windows has finished installing using our image!
It’s such a pristine filesystem, just as it would be when freshly imaged!
Feel free to stage any files on disk, folders, you name it. Go crazy here. You can install portable apps and point it to the locations on this new Windows image. Or you could copy your companies branding and logos down onto the machine, add a bunch of data or files you need every machine to have. The sky is the limit.
For me, it’s enough to copy CMtrace.exe into the C:\mount\Windows\system32 folder, to ensure that it will be on disk when I need it!
If this good enough, scroll down to Pack up the image, or you could…
Optional: Make Registry Changes on the image
While we have the filesystem expanded on our PC, you can also stage registry settings too! That’s right, you can edit the registry contained within a .wim file! Awesome!
Most people don’t know it, but the registry is just a couple of files saved on disk. Specifically, they’re found at C:\Windows\system32\config. That means in our expanded image, it will be found at c:\mount\Windows\system32\config. Windows-chan is very shy and doesn’t want you peeking under her skirt, so she makes you make SURE you know what you’re doing.
We can mount these guys into our own registry and mess with them using Regedit! Cool! As an example, to mount the Default User’s Profile for our new Image, you’d run:
I don’t know about you, but I think this is SOO cool!
When you’re done hacking around, you can save the settings by running:
reg unload HKLM\Mount
Now, we’re almost done…
Packing up the image
We’ve made all of our changes, but still have the .WIM opened up on our computer, mounted at c:\Mount. To save the changes back into a .WIM file, run this command.
dism /unmount-wim /mountdir:C:\Mount /commit
Here’s the output….
And now, the very final step.
Convert to a bootable ISO
With all of our changes completed, it’s time to take our file structure on disk and make it into a bootable ISO file for mass deployment. You could spend hours fumbling around…or just use Johan’s awesome script, available here!
And that’s it? Any other must have automation tips you think I missed? Let me know! Of course, if you want to REALLY automate things, you need to look at WDS, MDT, or SCCM! But for test lab automation, these settings here have saved me a load of time, and I hope they help you too!
Locking a workstation using PowerShell? It sounds like an easy task, right? That’s what I thought too…and told the customer…but NO! Friends, it wasn’t easy…before now.
As it turns out, some tasks in Windows just aren’t accessible via WMI. For instance, the useful Win32_OperatingSystem class has some nifty methods for working with the system’s power state, like Reboot and Shutdown…but strangely none for locking the system!
Then I stumbled upon this useful post by Ed over at The Scripting Guys, but this was back in the dark ages of VBScript, and unfortunately the only answer they found was to use Rundll32.exe to call a method in a dll and that, frankly will not fly. You’ll hear the shrillest high and lowest lows over the radio, and my voice will guide you home, they will see us waving from such great heights–
Sorry, that phrase is still a trigger word for me and takes me back to my deeply embarrassing emo phase…moving right along.
How to work with native methods easily in PowerShell
If you want to know how this is done…stop right here and read this awesome blog post by Danny Tuppenny on the topic. It’s eye-wateringly in-depth. But if you just want an example of how it is done, lets proceed.
Now, we all know by now that we can use Add-Type to work with native C# code…but the brilliant thing that Danny did is create a function which just makes it very easy to import a dll and get at the methods within…then surface those methods as a new class. It’s the bomb.com.
# Helper functions for building the class
$script:nativeMethods = @();
function Register-NativeMethod([string]$dll, [string]$methodSignature)
{
    $script:nativeMethods += [PSCustomObject]@{ Dll = $dll; Signature = $methodSignature; }
}
function Add-NativeMethods()
{
    $nativeMethodsCode = $script:nativeMethods | % { "
        [DllImport(`"$($_.Dll)`")]
        public static extern $($_.Signature);
    " }

    Add-Type @"
        using System;
        using System.Runtime.InteropServices;
        public static class NativeMethods {
            $nativeMethodsCode
        }
"@
}
With that done, we’ll now have some a function available to us, Register-NativeMethod. To use this, we simply provide the name of the .dll we want to use, and then what’s known as the method signature. For instance, let’s say I wanted to use User32.dll to move a window, as described here. Here’s the method signature for that method.
BOOL WINAPI MoveWindow(
  _In_ HWND hWnd,
  _In_ int  X,
  _In_ int  Y,
  _In_ int  nWidth,
  _In_ int  nHeight,
  _In_ BOOL bRepaint
);
The hWnd is kind of a special variable, it means HandlerWindow, or MainWindowHandle. You can get a MainWindowHandle by running Get-Process Name | select MainWindowHandle. All of the other values are just integeres, so that would be the window position in X and Y and the width and height. Finally, you can provide a true, false value with bRepaint (but I didn’t bother).
We can implement this in PowerShell by using the Register-NativeMethod function, like so:
Register-NativeMethod "user32.dll" "bool MoveWindow(IntPtr hWnd, int X, int Y, int nWidth, int nHeight)"
If you’d like to know what other Methods are available, you can turn to the lovely Pinvoke website which has a listing of every method available from all of these dlls. And you can just plug and play them all, easily!
Particularly of note are methods in user32.dll and kernel32.dll, but deep-linking doesn’t work, so you’ll have to click the dll name on the left column.
But what about locking the WorkStation?
I didn’t forget about you! To lock the workstation, run
Register-NativeMethod "user32.dll" "bool LockWorkStation()"

#Calling the method to lock it up
[NativeMethods]::LockWorkStation()
Complete Code
# Helper functions for building the class
$script:nativeMethods = @();
function Register-NativeMethod([string]$dll, [string]$methodSignature)
{
    $script:nativeMethods += [PSCustomObject]@{ Dll = $dll; Signature = $methodSignature; }
}
function Add-NativeMethods()
{
    $nativeMethodsCode = $script:nativeMethods | % { "
        [DllImport(`"$($_.Dll)`")]
        public static extern $($_.Signature);
    " }

    Add-Type @"
        using System;
        using System.Runtime.InteropServices;
        public static class NativeMethods {
            $nativeMethodsCode
        }
"@
}


# Add methods here

Register-NativeMethod "user32.dll" "bool LockWorkStation()"
Register-NativeMethod "user32.dll" "bool MoveWindow(IntPtr hWnd, int X, int Y, int nWidth, int nHeight)"
# This builds the class and registers them (you can only do this one-per-session, as the type cannot be unloaded?)
Add-NativeMethods

#Calling the method
[NativeMethods]::LockWorkStation()
An alternate title might be ‘Running PowerShell Code ONLY when the power state changes’, because that was the very interesting task I received from my customer this week.
Now, this will trigger whenever the power state changes, whether you plug the device in, OR unplug it. So you might further want to stop and pause to ask the question:
Am I on power or not?
Fortunately we can use the WMI Class Win32_BatteryStatus to detect if we’re charging or not, so here’s the full construct that I use to ONLY run an operation when a power event changes, and then only if I’m no longer on Power.
Locking the workstation when the system is unplugged
Register-WMIEvent -query "Select * From Win32_PowerManagementEvent" `
  -sourceIdentifier "Power" `
  -action {
      if ([BOOL](Get-WmiObject -Class BatteryStatus -Namespace root\wmi).PowerOnLine ){
         #Device is plugged in now, do this action
         write-host "Power on!"
     }
    else{
        #Device is NOT plugged in now, do this action
        write-host "Now on battery, locking..."
        [NativeMethods]::LockWorkStation()
     }
If you’re curious how this looks in real time
Using PowerShell to register for a WMI event, to lock a workstation on power state change pic.twitter.com/JtJWDosA4b
It can also be useful to have your code wait for something to happen with devices, such as running an action when a device is added or removed. To do this, use this code.
#Register for power state change
#Where TargetInstance ISA 'Win32_Process'"
Register-WMIEvent -query "Select * From Win32_DeviceChangeEvent where EventType = '2'" `
-sourceIdentifier "Power" `
-action {#Do Something when a device is added
Write-host "Device added at $(Get-date)"
}
You might also want to do an action if a device is removed instead, so use this table to choose which event is right for you. Read more about it here.
EventType
Id
ConfigurationChanged
1
Device Arrived
2
Device Removed
3
Device Docked
4
What else can I wait for?
Not only these, but you can trigger your code to execute on a variety of useful WMI Events, all of which can be seen in this image below!
This will be a quick post here, but I just wanted to shine a spotlight on an AWESOME tool that I absolutely love: Joshua King’s ‘BurntToast’ PowerShell module, which makes the arduous task of rendering a Windows Toast notification VERY Easy.
Any time you want to provide data to the end-user, but not require them to drop everything to interact. I don’t know about you, but I really dislike alert dialog boxes. Especially if they lock my whole desktop until I quickly ignore it and click the ‘X’ button…err, read it.
I also believe that toasts are what users expect, especially to receive updates from long-running scripts. They really do provide a polished, refined look to your scripts.
Finally, you can also provide your own image and play your own sound effects too!
Real-time encryption notices
At a current customer, we’re deploying a device management profile using MDM to use BitLocker encryption on these devices. We decided that it would be very useful to be able to see updates as a device was encrypting, so I wrote up this script around the BurntToast tool.
This post is part of the series on AutoCompletion options for PowerShell! Click the banner for more posts in the series!
Probably my single favorite feature of PowerShell isn’t exciting to most people…but I love Auto-Completion. I have my reasons:
As I have the typing skills of a preying mantis (why did I mention them…they’re easily the creepiest and worst insect…ewww) and constantly typo everything, I LOVE auto-completion.
Add to that the fact that I have lost a memory competition to a gold fish, and I REALLY Depend upon it.
If you have a memory like me, and like this guy, you’ll love Auto-complete
PowerShell helps deeply flawed people like me by offering tons of built-in help and autocomplete practically everywhere. Some of it is done for us, automatically, while others require a bit more work from us as toolmakers in order to enable the sweet sweet tab expansion.
In the world of AutoCompletion, there are two real types of AutoComplete that PowerShell offers. In this series, we’ll cover these two types of PowerShell autocompletion:
Part 1 – (This post) Parameter AutoComplete
Part 2 – (Coming soon) Output AutoComplete
This post is going to be all about the first one.
Parameter AutoComplete
In PowerShell, when you define a Function, any of your parameter names are automatically compiled and available via autocompletion. For instance, in this very simple function:
Function Do-Stuff {
param(
    $Name,$count)

    For($i = 1 ; $i -le $count; $i++){

        "Displaying $name, time $i of $count"

    }

}
As you’ll see in the GIF below, PowerShell will compile my function and then automatically allow me to tabcomplete through the available parameter names.
That’s nice and convenient, but what if I want to prepopulate some values, for the user to type through those? There’s two ways of doing that (well, at least two). If we constrain the values a user can provide using [ValidateSet()], we’ll automatically get some new autocomplete functionality, like so.
Now, for most of our production scripts…this is actually pretty good. We might only want our code to run one on or two machines, or accounts, or whatever.
But what if we wanted our function to instead display a dynamic list of all the available options? We can do this by adding dynamic parameters.
Dynamic Parameters
You can read about it here at the very bottom of the help page entry for about_Function_Advanced_Parameters, but I don’t really like the description they give. These parameters work by executing a script block and building up a list of the available options at the time of execution, Dynamically.
In our example, we’re going to recreate the wheel and make our own Restart-Service cmdlet, and replicate the feeling of it auto-populating the available services. But this time, it’s going to work on remote computers! The code and technique were both originally covered by Martin Schvartzman in his post Dynamic ValidateSet in DynamicParameters on Technet.
For a starting point, here’s a super basic function to use Get-WmiObject to start and stop services on remote computers. There is NO error handling either.
Function Restart-RemoteService{
Param($computername=$env:COMPUTERNAME,$srv="BITS")

  ForEach($machine in $computername){
    write-host "Stopping service $srv..." -NoNewline
    Get-WmiObject -ClassName Win32_Service -ComputerName $machine |
       Where Name -eq $srv | % StopService | Out-Null
    write-host "[OK]" -ForegroundColor Cyan

    Write-Host "Starting Service $srv..." -NoNewline
    Get-WmiObject -ClassName Win32_Service -ComputerName $machine |
       Where Name -eq $srv | % StartService | Out-Null
    write-host "[OK]" -ForegroundColor Cyan
    }
}
Thus far, it will work, but t doesn’t give us Dynamic Autocomplete. Let’s add that.
First things first, in order to have a Dynamic parameter, we have to be using [CmdletBinding()] and we also need to define our DynamicParam in its own special scriptblock, after the regular params.
Function Restart-RemoteService{
[CmdletBinding()]
Param($computername=$env:COMPUTERNAME)
    DynamicParam {
    #define DynamicParam here
    }
Now, within our DynamicParam block, we have to do a few things:
Name the param
Create a RuntimeDefinedParameterDictionary object
Build all of the properties of this param, including its position, whether it is mandatory or not, etc, and add all of these properties to a new AttributeCollection object
Define the actual logic for our param values by creating a dynamic ValidateSet object
Add these all up and return our completed DynamicParam, and end the dynamic block
Add a Begin and Process block to our code, and within the Begin block, commit the user input to a friendly variable (otherwise the value lives within $PSBoundParameters
First, we name the Param here:
DynamicParam {

            # Set the dynamic parameters' name
            $ParameterName = 'Service'
You know how when we normally define a parameter, we can specify all of these nifty values, like this?
If we want to do this for a dynamic parameter, we have to create a System.Management.Automation.RuntimeDefinedParameterDictionary and add all of the properties we want to it. In fact, that’s the next thing we do, and we have to do it. We make a new Dictionary, then make a new collection of attributes (like Mandatory, Position, etc), then we manually add all of the Parameters to the dictionary. Yeah, it totally blows.
# Create the dictionary
$RuntimeParameterDictionary = New-Object System.Management.Automation.RuntimeDefinedParameterDictionary

# Create the collection of attributes
$AttributeCollection = New-Object System.Collections.ObjectModel.Collection[System.Attribute]
With that, we’re ready to make some attributes. Stick with me, I promise we’re about to do something fun. In the next step, we’ll make the ServiceName mandatory, and specify a position of 1 if the user is lazy.
# Create and set the parameters' attributes
$ParameterAttribute = New-Object System.Management.Automation.ParameterAttribute
$ParameterAttribute.Mandatory = $true
$ParameterAttribute.Position = 1

#Add the attributes to the attributes collection
$AttributeCollection.Add($ParameterAttribute)
Alright, finally the cool part! Here’s where we populate our dynamic parameter list! We do this by running our arbitrary code (remember, these are values we’re specifying, so you need to remember to append Select -ExpandProperty #YourPropertyName to the end of your statement, or nothing will happen), and then we take the output of our code (which we want to become the values the user can tab through) and we add them as a custom ValidateSet.
Yup, that’s all we were doing this whole time, setting up a big structure to let us do a script based ValidateSet. Sorry to spoil it for you.
#Code to generate the values that our user can tab through
$arrSet = Get-WmiObject Win32_Service -ComputerName $computername | select -ExpandProperty Name
$ValidateSetAttribute = New-Object System.Management.Automation.ValidateSetAttribute($arrSet)
OK, we’re in the home stretch. All that remains is to crete a new Parameter object using all of the stuff we’ve done in the previous 10 lines, then we add it to our collection, and Bob’s your uncle.
# Add the ValidateSet to the attributes collection
$AttributeCollection.Add($ValidateSetAttribute)

# Create and return the dynamic parameter
$RuntimeParameter = New-Object System.Management.Automation.RuntimeDefinedParameter($ParameterName, [string], $AttributeCollection)
$RuntimeParameterDictionary.Add($ParameterName, $RuntimeParameter)
return $RuntimeParameterDictionary
    }

begin {
# Bind the parameter to a friendly variable
$Service = $PsBoundParameters[$ParameterName]
    }
Particularly of note is that last bit, in the Begin block. Strangely enough, PowerShell will receive the values the user inputs, but saves them within $PSBoundParameters, its up to us to actually commit the value the user inputs into the variable name of $service so that we can use it.
Putting that all together, here’s the complete DynamicParam{} scriptblock.
DynamicParam {

            # Set the dynamic parameters' name
            $ParameterName = 'Service'

            # Create the dictionary
            $RuntimeParameterDictionary = New-Object System.Management.Automation.RuntimeDefinedParameterDictionary

            # Create the collection of attributes
            $AttributeCollection = New-Object System.Collections.ObjectModel.Collection[System.Attribute]

            # Create and set the parameters' attributes
            $ParameterAttribute = New-Object System.Management.Automation.ParameterAttribute
            $ParameterAttribute.Mandatory = $true
            $ParameterAttribute.Position = 1

            # Add the attributes to the attributes collection
            $AttributeCollection.Add($ParameterAttribute)

            # Generate and set the ValidateSet
            $arrSet = Get-WmiObject Win32_Service -ComputerName $computername | select -ExpandProperty Name
            $ValidateSetAttribute = New-Object System.Management.Automation.ValidateSetAttribute($arrSet)

            # Add the ValidateSet to the attributes collection
            $AttributeCollection.Add($ValidateSetAttribute)

            # Create and return the dynamic parameter
            $RuntimeParameter = New-Object System.Management.Automation.RuntimeDefinedParameter($ParameterName, [string], $AttributeCollection)
            $RuntimeParameterDictionary.Add($ParameterName, $RuntimeParameter)
            return $RuntimeParameterDictionary
    }

    begin {
        # Bind the parameter to a friendly variable
        $Service = $PsBoundParameters[$ParameterName]
    }
And in progress. Keep your eyes on the birdy here, as you’ll see the Services start to populate almost immediately after I hit tab, then the service on the left side will very quickly stop and start.
Oh boy, this has been a rollercoaster of emotions. But guys…we made it. We have finally, and definitively answered what happens to WinRM with HTTPs when certificates expire. If you’re curious about why this is a big question, see my previous posts on this topic.
Up until now, I’ve been able to say, conclusively, that WinRM generally seems to work, even as Certs expire and are renewed. But I’ve never known why: did WinRM automatically update the certs? Does Windows just not care about certs? What is the purpose of life?
Well, I can now shed light on at least some of those questions. I knew what I needed to do
Record a WireShark transfer and extract the certificate to tell definitively, which cert is being used to validate the session. Then we’ll know what happens.
Setting the stage
Two VMs, one domain. Server 2016 server, connected to from a Server 2012 R2 client. Newly created WinRM capable Certificate Template available to all domain members with a 4 hour expiration and 2 hour renewal period.
With the stage set, and the cert was present on both machines, I ran winrm quickconfig -transport:https on each, then made sure they could see each other, and remoted from one into the other. I recorded a WireShark trace of the remote session, uh remoting, then ran a command or two, then stopped recording. Then I opened the trace.
Swimming with the Sharks
How I felt looking at all of these packets
When you first open WireShark and start recording, you may be a bit dismayed…
If you were to browse a website, or do other transaction with SSL, WireShark is smart enough to break it down and show you each step in the transaction. However, with PowerShell remoting using SSL over the non-standard support of 5986, you have to tell WireShark how to treat this data. Do this by clicking one of the first SYN \ ACK \ ECN commands, then click Analyze\ Decode as...
You’ll need to provide both the Source and Destination port (don’t worry, if you clicked one of the packets as I recommended, you can just select them from the dropdown for Value), and then pick ‘SSL’ from the dropdown list on the right.
This is a REALLY big image (captured from my 4k), open in it’s own tab!
Now you can finally see the individual steps!
Since we can see these steps, we can now drill down and see which cert is being used. That’s right, we can actually extract the certificate.
Extracting a certificate
Find the step which has the lines Server Hello, Certificate ... and other values in it.
Now, in the Details pane below, click on Secure Sockets Layer
Follow the arrows above, and click through to TLS, Handshake Protocol: Certificate, Certificates, and finally right-click Certificate
Choose Extract Packet Bytes and then choose where to dump the file.
Make sure to save as .DER format
With this done, you can now double-click to open the cert and see what was transmitted over the wire. Pretty crazy, huh? This is one reason why man-in-the-middle attacks are so scary. But then again, they’d have to worry about network timing, cert chains and name resolution too in order to really appear as you. But anyway, lets look and see which cert was used to authenticate this WinRM Session.
Click over to the details tab
In this next screen shot, on the left is the cert I recovered from WireShark. The one on the right is the original cert from the MMC from the same computer.
Note that the Cert Thumbprint matches…this will become critical later
So, now we’ve found out how we can recover certificates from a WireShark trace. Now all that remains is to wait the four hours for this cert to expire, and see what happens!
Waiting for the cert to renew
While I was away, I left a little chunk of code running, which will list the valid certs on the computer, and echo out their thumbprints. It also echoes out the cert listed in the HTTPS listener of WinRM. By keeping an eye on this, I know when the cert has been renewed. Here’s the code:
So, I was really happy to see this when I came back
The difference between the current thumbprint and the one listed in WinRM told me that the cert had renewed…but strangely enough WinRM on a Server 2016 machine still references the old thumbprint.
This old thumbprint was listed EVERYWHERE. Now, the moment of truth, to run a new WireShark trace and extract the cert. I was sitting there with baited breath, very excited to see the results! And…
Jesus Christ man, just tell us what happened
Alright, here is what I saw when I opened the cert from the machine and saw what was listed in the MMC. It’s listed side by side with what you see in WinRM or WSMan
How long are you going to drag this on…
OK, the moment of truth. Which actual cert was used for this communication?
Did WinRM:
A: Use the original, now expired cert
B: Not use a cert at all?
C: Actually use the renewed cert, even though all evidence points to the contrary?
To find out, I had to take another WireShark trace and run through all of these steps again. But what I found shocked me…
Yep. Sure enough! When decoding the certificate on the machine, I found that WinRM does actually use the renewed certificate, even though all evidence (and many sources from MSFT) point to the contrary. This is at least the case on a Server 2012 R2 machine remoting into Server 2016. Later today I’ll update with the results of 2012 to 2012, 2016 to 2016, and two goats on a chicken while a sheep watches.
What does it all mean?
In conclusion, WinRM does actually seem to handle cert expiry gracefully, at least on PowerShell 4 and up and Server 2012 R2 and newer. I’ve tested client and server connection mode from Server 2012R2 and 2016 thus far.
One of the things I absolutely love about my job is being thrown into the deep end of the rapids with little to no time to prepare given the opportunity to try new things and new technologies, pushing me out of my comfort zone. It normally goes okay.
actual camera footage of my last project
Case in point: a client of ours recently was investigating WinRM and whether or not it was secure, leading me down a rabbit hole of Certificates, Enterprise CA’s, SSL Handshakes, WireShark and more.
At the end of the initiative, I was asked to write up a summary to answer the question
In this post, I’ll talk us through my findings after days of research and testing, stepping through the default settings and some edge cases, hopefully covering the minimum you need to know in a short little post.
Authentication Security
Consider the following scenario: two computers, both members of the same domain. We run winrm quickconfig on both computers and don’t take any additional steps to lock things down. Is it secure? Are credentials or results passed in the clear? Until stated otherwise, assume HTTP until I mention it again.
From the very first communications and with no additional configuration, connections between the two computers will use Kerberos for initial authentication. If you’re not familiar with it, the bare minimum to know is that Kerberos is a trusted mechanism which ensures that credentials are strongly protected, and has a lot of nifty features like hashing and tickets which are used to ensure that raw credentials never go over the wire. So, domain joined computers do not pass creds in the clear.
Well, what if the two machines are in a workgroup instead? Workgroup machines trust each other, but don’t have a domain controller to act as the central point of authority for identity, so they have to use the dated NT LAN Manager (NTLM) protocol instead. NTLM is known to be less secure than Kerberos, and has it’s own vulnerabilities, but still obfuscates credentials with a strong one-way hash. No credentials go over the wire in the clear in this scenario either.
On-going Security
For those keeping track, thus far we’ve found that neither domain joined or workgroup PCs will transmit creds in the clear, or in easily reversed encryption for the initial connection. But what about further communications? Will those be in plaintext?
Once the authentication phase has completed, with either Kerberos (used in a domain) or NTLM (when machines aren’t in a domain) all session communications are encrypted using a symmetric 256-bit key, even with HTTP as the protocol.
This means that by default, even with plain old HTTP used as the protocol, WinRM is rolling encryption for our data. Awesome!
In that case, when do we need HTTPs
Let’s go back to the workgroup / DMZ scenario. In this world, NTLM is the authentication mechanism used. We mentioned earlier however, that NTLM has known issues in that it is relatively trivial for a skilled attacker to impersonate another server.
Fortunately, we have a perfect remedy to this impersonation issue! We can simply use HTTPS as the transport for NTLM communications. HTTPS’ inclusion of SSL resolves issues of Server Identity, but requires some configuration to deploy. With SSL, both computers must be able to enroll and receiving a valid Server Authentication certificate from a mutually trusted Certification Authority. These certificates are used to satisfy the need to validate server identity, effectively patching the server impersonation vulnerability of NTLM.
In the world of WinRM over HTTPs, once initial authentication has concluded, client communication is now doubly secured, since we’ve already got our default AES-256 Symmetric keys from WinRM mentioned earlier, which is within the outer security layer of the SSL secured transport tunnel.
I was told it would be in the clear?
In case you’re just reading the headings, at no point so far are connections sent in the clear with the steps we’ve outlined here.
However, if you’re really interested in doing it, is possible to allow for cleartext communications…it just requires one taking the safety off, propping one’s foot up, and really, really circumventing all of the default security in order to shoot one’s self in one’s foot.
On both the client and server, one must make a handful of specific modifications to the winrm server and client, to specify Basic Authentication mode and place the service in AllowUnecrypted mode.
If we take these steps, and then force the actual remote connection into Basic mode with
Then and only then will we pass communications in the clear. The actual payload of messages will be viewable by anyone on the network, while the credentials will be lightly secured with easily reversible base64 encryption. Base64 is used SO often to lightly secure things that some folks call it ‘encraption’. In fact, if you’re listening on a network and see some base64 packets, you might want to try to decrypt them, could be something interesting. For more on this topic, read Lee’s excellent article Compromising yourself with WinRM.
Conclusion
For machines which are domain joined and will have access to a domain controller for Kerberos authentication, SSL is just not necessary.
However, for machines which may be compromised within a DMZ or workgroup, SSL provides an added layer of protection which elevates confidence in a potentially hazardous environment.
TL:DR WinRM is actually pretty good and you probably don’t need HTTPs
Windows 10 built on the awesome features of Windows 8, and brought over the very powerful ‘Refresh My PC’ and ‘Reset My PC’ options. Truly awesome, they’re able to refresh the base OS and forklift over your files, giving you that ‘just installed’ smell we all love so much.
I love that smell so much in fact, that I buy a new car every few weeks, or sometimes sleep in cars at the CarMax down the road from my house. Mmmmm plastic and leather offgas.
However, sometimes things go awry, and from no fault of our own, we can end up with a system which will refuse to either reset or refresh. Read on to see how to fix this problem.
Symptom
When trying to run the Refresh or Reset task, both of which call SystemReset.exe, you experience an error like the following
There was a problem resetting your PC
This one is pretty tricky to solve, as it doesn’t log any messages in the Event Viewer.
Diagnosis
While there are no messages in the Event Viewer (shame on you guys, Microsoft, could make this a LOT easier to diagnose), the process does leave behind some nice forensic information for us. If you enable viewing hidden folders, or run dir c:\ /a:sh, you’ll be able to see a $SysReset folder created on the root of your OS Drive.
This folder contains some log files which might help, specifically C:\$SysReset\Logs\Setupact.log, read this file to see what the issue is.
Possible Cause
In my case, the error points to either a missing or unsupported version of the recovery image, as seen here:
Factory: No recovery image registered[gle=0x000000ea] Reset: Unsupported WinRE / OS versions[gle=0x000000ea]If you see this, a good place to check next is your Windows Recovery configuration settings, found at c:\windows\system32\Recovery\ReAgent.xml. When you open this file, you should see something like this:
To highlight the issue, we’re looking at the GUID properties for ImageLocation. In a bad system, it will be listed as all zeroes. A good system will have a normal, multi-digit GUID listed there.
If so, then the problem is probably that your Windows Recovery Environment image is corrupted or somehow incorrect. Fortunately, this is pretty easy to fix, by copying the WinRE partition from another known good computer.
Solution
UPDATE: I found a MUCH easier way to do this, try this step first before using the old steps, it might ‘just work’ for you!
You can let Windows automatically repair the WinRE environment by disabling and re-enabling it. This does not always work, but I’ve been pleasantly surprised to find it working most of time, and rarely need to use the Manual Method anymore.
This is really simple too. First, launch a command prompt as administrator, then run.
reagentc /disable
<reboot>
reagentc /enable
This method will only work if the copy of WinRE listed in ReAgent.xml under ImageLocation is valid, but the GUID is incorrect. If this is not the case for you, you can still use the manual steps below!
If this worked…you’ll quickly be resetting your PC in no time (warning: this gif is at like 400x speed)
Manual Method
Here’s the general steps we’ll be taking:
Copy WinRE from a known good computer by
Finding the hidden recovery partition
Setting it as Read/Write by changing the ID
Giving yourself permissions to view the files
copy them
!!Restore the permissions to the Recovery Partition!! (don’t skip this!)
Place them on the issue PC with largely the same steps
First, mount your recovery partition. You do this by launching cmd as Administrator.
Next, run Diskpart and select the first disk, first partition. diskpart list disk
select disk 0
Now to pick our partition, which almost always be 0. However, pick whichever one says ‘Recovery’ for the type.
list part

select part 1
For the next few steps, we’re going to change the type of this parition, which serves to ‘unhide’ it, so that we can mount it and REALLY start breaking things. But first, we need to document the drives current ID so that we don’t catch everything on fire. We’re going to detail the partition to see the Type. Then, highlight it and copy it off into a text editor or something. (Don’t write it down by hand…if that’s your approach, there’s a whole new world out there!)
detail part
Marking the drive as R/W
Proceed with caution…
If you’re on a Windows 10 system, you’re most likely working with GUID Partition Table disks (GPT), and not the old fogey MBR disks. Most of the examples on the internet tell you try running set ID=07 override but that just won’t work on modern drives. Before we proceed, here are the valid ID types for GPT drives.
EFI System partition:  c12a7328-f81f-11d2-ba4b-00a0c93ec93b
Basic data partition:  ebd0a0a2-b9e5-4433-87c0-68b6b72699c7
Hidden / System        de94bba4-06d1-4d40-a16a-bfd50179d6ac
However, your System Reserved Partition will have its own unique value. Make SURE you copy it down using detail part before going any further.
To mark this partition as unhidden, run this command instead.
SET ID=ebd0a0a2-b9e5-4433-87c0-68b6b72699c7
With this done, Windows now sees this as a normal data partition. All that remains is to assign a drive letter to it.
First, run list vol to see which volume your recovery partition ended up with. In my case, it is now Volume 4. Then run assign letter=<some letter>.
As soon as you run this command, the volume will open in Explorer!
If you don’t see these files, open up Folder Options and make sure that you enable ‘Show Hidden files, folders’, and uncheck ‘Hide Protected Operating System Files’.
Now, simply copy the files into here from your known-good reference machine, and ensure that the GUIDs match up.
And finally, make the partition hidden again by running the following command as an admin again.
SET ID=de94bba4-06d1-4d40-a16a-bfd50179d6ac
Conclusion
I hope this helps you to recover your, uh, Recovery Partition if you ever get stuck in a similar situation. For more useful information, check out these links.
Recently, I had a customer looking at setting up potentially tens of thousands of Point of Sale Kiosks running Windows 10 on an LTSB branch. We wanted users to have to input their password, but noticed that if a Windows 10 machine is in the docking station, the Touch Keyboard will never display!
Paradoxically, if the user has a Windows Hello Pin specified, that version of the touch keyboard will appear. But for a regular password? Nope, no On-Screen Keyboard. And using the dated compatibility keyboard (OSK.exe) was not an option.
To illustrate how weird this confluence of conditions was, I’ve provided a video
On screen keyboard won't display on 2016 LTSB when docked, with no physical keyboard. Anyone have a pointer? pic.twitter.com/rOKC9AnCNM
while these values allow the Windows keyboard to appear anywhere within Windows, it has no affect on the lock screen if the system is in a docking station.
The weirdest part? If the tablet is undocked, even if you plug a USB Keyboard into the tablet…the On Screen keyboard will display!
The Cause
This strange behavior told me that something was happening related to the system being docked, which was telling Windows to suppress the keyboard on the login screen. All of this pointed to some specific registry key being set when the tablet was docked, which instructed the Touch Keyboard (TableTip.exe) to be suppressed at login when docked.
How to use ProcMon
Because we could control the behavior (i.e. recreate the issue) we could narrow down the scope and look for changes. This spells ProcessMonitor to me! Now ProcMon can DROWN you in data and bring even a powerful system even to its knees so effective filtering is key to getting anything done.
I opened the program, started a trace and then logged off, tried to bring up the keyboard, then logged back in and paused the trace. Next.. because I suspected that (and I hoped, as it would be easier for me if it were a simple regkey) it was a regkey hosing me up here, I filtered everything else out by clicking these icons. Remember, we need to filter out superfluous data so we can find what we want!
This dropped me down to only 235K events instead of 267K.
Next, I knew the program for the keyboard is called TabTip so I filtered for just that. If you need to, you can click the cross hairs and drag down onto a process to lock to just that.This should really drop down the number of entries (down to 30k for me!)
Finally, let’s filter for only RegQueryValue events, which tells us that ProcMon looked for a Regkey. This is a hint that we are able to possibly influence things by changing a key.
And now…hit Control+F and get clever trying to find your value! I knew that Windows called this SlateMode, so I searched around for that…and this one kept calling my name.
Both CSRSS and TabTip kept checking for this value …hmm…Let’s try fiddling with it
I set it to Zero and logged out and…BOOM baby!
I finally had a keyboard on the lock screen while docked! Oh yeah!
If this key is set to 0, the Touch Keyboard will always be available.
Unfortunately, when a device is docked or undocked, Windows recalculates the value of this key and no amount of restrictive permissions can prevent Windows from changing the value.
Nothing prevents us from changing the value right back though! To sum it up in GIF form, this is what we’re about to do here:
The Fix
To resolve this issue, the following PowerShell script should be deployed as a scheduled task, to execute at boot and with the highest privilege. It will run silently in the background and recognize docking/undocking events. When one occurs, it will reset the value of the key to 0 again, ensuring the keyboard is always available.
set-ItemProperty HKLM:\SYSTEM\CurrentControlSet\Control\PriorityControl -Name ConvertibleSlateMode -Value 0 -PassThru

#Register for device state change
Register-WMIEvent -query "Select * From Win32_DeviceChangeEvent where EventType = '2'" `
-sourceIdentifier "dockingEvent_Ocurred" `
-action {#Do Something when a device is added
$val = get-ItemProperty HKLM:\SYSTEM\CurrentControlSet\Control\PriorityControl | select -expand ConvertibleSlateMode
write-output "$(get-date) current value of $val"  >> c:\utils\reglog.log
set-ItemProperty HKLM:\SYSTEM\CurrentControlSet\Control\PriorityControl -Name ConvertibleSlateMode -Value 0 -PassThru
$val = get-ItemProperty HKLM:\SYSTEM\CurrentControlSet\Control\PriorityControl | select -expand ConvertibleSlateMode
write-output "$(get-date) current value of $val"  >> c:\utils\reglog.log

}

while($true){
start-sleep 3600
#perform garbage collection in case we're getting clingy with our memory
[System.GC]::Collect()

}
Is this safe for production?
Certainly! Now, ideally, I’d rather find and set a single registry key value and I think that Microsoft will eventually fix this in a Windows Update or new release of LTSB. If that happens, I’ll update this post, but as of today, this is the necessary work around for Windows 10 2016 LTSB and release 1702.
Have you solved this problem too? Have a better way? I’d love to hear it! Normally I would lock down permissions to the registry key to keep Windows from changing the value back, but that wouldn’t work in this case. I’m open to other options if you’d like to share.
This post is part of the series on AutoCompletion options for PowerShell! Click the banner for more posts in the series!
Previously in this series, we reviewed a few ways to add AutoComplete onto your functions, covering Param AutoCompletion and Dynamic Parameters. In this post, we’ll spend a LOT of time typing in the present to help our future selves save fractions of a second, because there’s no way we’ll become less lazy, right? At the end of the day, we will have achieved the holy grail of Attaboys, and have Output Autocomplete working in our function.
Output AutoComplete
You know how in PowerShell you can type a cmdlet, then pipe into Select-Object or another cmdlet and start tabbing through property names? This is the type of Autocompletion we are going to add to our function in this post!
Not only does this save you from making mistakes, but it is amazingly convenient and really gives our functions a polished and professional look and feel. PowerShell’s ability to do this highlights one of its distinguishing features as well!
Dynamic Type System
Warning: this next part is probably kind of boring
If you’re like me, you read things and then just gloss over all of the words and symbols you don’t know, assuming they’re unimportant. If I just described you, then I hate to be the one to tell you this, but that is kind of a tremendous character flaw. I’ll get around to why this is bad and how it relates to PowerShell, but first, take us on a detour into my past.
Back in High School, I REALLY liked anime and wanted to learn Japanese. I was a cool kid, believe you me. So I took a semester of Japanese after which I kind-of, sort-of knew how to read their alphabet.
Well, one of their three. And only the easy alphabet. Surely that will not come back to bite me, right?
So, me, being a very cocky and attractive (read 200 lb redhead with braces and a predilection for silky anime shirts with muscle dudes on them) was sure that I knew enough Japanese to survive in Japan and I signed up for the foreign exchange student program.
And on my first night in Japan, was greeted with this in the washroom.
Except mine had only Japanese characters on it…and two of the three were kanji (which I couldn’t read at all). What the heck could the other ones be? I knew that one was Shampoo but the other two?
I’d seen that my host family had been taking their toothbruses with them into the washroom, so one of these had to be toothpaste, right. There’s no way they had a tooth paste tube in the shower…right? (Hint: they did). So one of them has to be toothpaste!
That means the other had to be body wash!
And that’s how I spent a week in Japan, brushing my teeth with bodywash and trying to get clean using conditioner. I will say this though…the hair on my arms was positively luxurious! Eventually my host mom realized what I was doing and boy did she have a good laugh.
How does this relate to PowerShell again?
Well, I was guilty of skipping over things in the PowerShell world too…like the phrase ‘dynamically typed scripting language’. I knew what a scripting language was, but had no clue what the hell types were, or why I’d want them to be dynamic. If you stop reading right now and go off and google about PowerShell, chances are you’ll see it explained like this:
You’ll find it described this way EVERYWHERE, in books, forums, blog posts. I even used to say the phrase in my training classes, and just hoped no one would ask me what it meant. If they did ask me what it meant, I would call an emergency bathroom break and hide until they hopefully forget their question.
Now, let’s talk about why DynamicTyping is awesome.
Why PowerShell’s dynamic type system is awesome
In a lot of programming languages, the type of variable or object must be specified before you can use it, like in C#.
int i, j, k;
char c, ch;
float f, salary;
double d;
If you want to use these variables, you’d better specify them ahead of time!
In PowerShell, variable types can be inferred based on the type of object. You can even have many types of object living in a variable, like so:
$a = 1, "ham", (get-date)
We don’t have to define the type of object ahead of time, PowerShell does it all for us. We can also convert items back and forth into different types as well. This kind of flexibility is PowerShell’s Dynamic Type system in action!
PowerShell further offers an adaptive type system. By default, we can run Get-ChildItem, which gives us a list of files, and by default shows us only the Mode, LastWriteTime, Length, and Name properties.
How does PowerShell know what properties to display? This all comes down to the PowerShell type system again.
If we pull a single object and pipe it over to Get-Member, we can see which type of object we’re working with:
This means that somewhere, PowerShell knows what type of properties a System.IO.FileInfo object should emit, and informs IntelliSense so that we can autocomplete it. It also knows which properties to display by default and how to display them. This all comes down to a whole boatload of .ps1xml files that live on your system.
However, we don’t have to go editing XML files if we want to tweak which properties are displayed, PowerShell is adaptive. We just need to Adapt…or Update things a bit.
But wait, does that mean I can change the properties for the type?
That’s a great question and it’s one of my absolutely favorite tricks in PowerShell. And thanks to its Adaptive Type System, we CAN change the properties for a type.
PowerShell 3.0 added the awesome Update-TypeData cmdlet, which let’s us append new properties to existing types. And it’s SO easy.
I used to always run some code like this, which would allow me to see the file size of a file in MBs, and show me some of the existing properties, then append my own calculated property to it.
Dir | select -first 4 LastWriteTime,Name,Length,`
@{Name='MB';exp={[math]::Round(($_.Length / 1mb))}}
Here it is in action:
But…there’s a better way! I took the same logic, and implemented it by modifying the typedata for System.IO.FileInfo. This is done using Update-TypeData and providing a scriptblock to instruct PowerShell as to how it should calculate our new property. Just swap your $_ references for $this and you’re golden.
One caveat, you have to manually specify this new property with a select statement, I haven’t found a way around it…yet!
The Type Information we’ve been talking about here is the key to how PowerShell knows which properties to display, and also how PowerShell cmdlets know which properties your cmdlet will output. This in turn is how we’re able to populate AutoComplete Data!
How do we tell PowerShell what our cmdlet is going to output?
There are two things we need to do to instruct PowerShell as to what our cmdlet will be emitting, which is needed to enable that cool AutoCompletion.
Define a new object type by creating a .ps1xml file
Add the .ps1xml file to our module manifest or module file
Modify our functions to add an [OutputType()] value
Wonder why Stephen can’t count to 3
PS1XML files aren’t that scary
If you’re like me, you’ve avoided .ps1xml files for your whole PowerShell career. Time to buck up cowboy, they’re not so bad!
First, you define the name of this new type of object. You can pick literally anything but I like the format of ModuleName.Automation.Object.TypeOfObject. Next, you add a <Members> node and within it you place a pretty self-descriptive block which includes the name of a property, and then the code used to resolve it.
In this syntax, you’ll be using the special $this variable, which we don’t see too often in PowerShell. Think of it as a stand-in for $PSItem or $_.
Rinse and repeat, defining each of the properties you want your object to emit. This is also where you can use a nifty value called the DefaultDisplayPropertySet to choose a small subset of your properties as the default values to be displayed.
This is a very nice ‘warm-fuzzy’ feature to have in your functions, because it makes them act more like standard PowerShell cmdlets. Go ahead and define a dozen properties for your objects and then also provide a default set, and when the user runs your cmdlet, they’ll see just the most relevant properties. However, a PowerShell PowerUser will know to pipe into Get-Member or Format-List and be impressed when they suddenly have a lot of extra properties to choose from.
Here’s how it looks to specify a DefaultDisplayPropertySet, if you’re interested.
That’s it for creating the type in XML. Now, you need to modify your PowerShell module to import your type file. You can do this in a Manifests file, (which I’ll cover in a future blog post), or you can also very easily do it by adding a line like this to the bottom of your .psm1 module file.
Finally, we simply modify our Functions in our module like so
function Get-AWDevice
{
[CmdletBinding()]
[Alias()]
[OutputType('AirWatch.Automation.Object.Device')]
Param
(
# How many entries to provide, DEFAULT: 100
Now when the module is imported, and I pipe into Get-Member and now my object type is displayed.
And all of my new properties are there too…but the real test…do I see my values?
VICTORY!
One last thing…
If you spent a lot of time in your .ps1xml file, or if you went over and above and made a Format.ps1xml file, customizing how your objects should be formatted or displayed in -Table or -List view you might be dismayed to see that PowerShell ignores your beautifully tailored formatting instructions. I know I was.
So, earlier when we added an [OutputType()] to our function, we were providing instructions that the IntelliSense engine uses to provide AutoCompletion services to our end-user. However, PowerShell does not force our output or cast it into our desired OutputType, we’ve got to do that ourselves.
You could get really fancy, and instantiate and instance of your type and use that to cast your object into it…but the really easy way to do this is to scroll to the bottom of your function, wherever you actually emit an output object, and add this line.
This will instruct PowerShell to interpret your custom object output as the desired type, at which point the formatting rules will be applied.
And if you haven’t created a Format.ps1xml file, worry not, as we’ll be covering it in a later blog post.
Sources
This was one of those posts that in the beginning seem deceptively simple and make me say ‘hmm, I know enough about the topic…surely I can write this in two hours’. Incorrect. I probably spent a solid 40 hours researching and writing this post, easily. And I had to do a lot of reading along the way. If you’ve got this far and wonder how I learned about it, these articles might be of interest to you.
This kind of request comes up all the time on StackOverflow and /r/PowerShell. “How can I extract content from a webpage using PowerShell”.
This post COULD have been called ‘Finding a Nintendo Switch with PowerShell’, in fact! I have been REALLY wanting a Nintendo Switch, and since I’ll be flying up to NYC next month for Tome’s NYC TechStravaganza (come see me if you’ll be in Manhattan that day!), it’s the perfect justification for She-Who-Holds-The-Wallet for me to get one!
But EVERYWHERE is sold out. Still!
However, the stores have been receiving inventory every now and then, and I know that when GameStop has it in stock, I want to buy it from them! So, since I’ve got a page I want to extract, my first step is to load the page!
Next, I want to find a particular element on the page, which I’ll parse to see if it looks like they have some in stock. For that, I need to locate the ID or ClassName of the particular element, which we’ll do using Chrome Developer Tools.
On the page, right-click ‘Inspect Element‘ on an element of your choosing. In my case, I will right-click on the ‘Unavailable’ text area.
This will launch the Chrome Developer Console, and should have the element selected for you in the console, so you can just copy the class name. You can see me moving the mouse around, I do this to see which element is the most likely one to contain the value.
You want the class name, in this case ats-prodBuy-inventory. We can use PowerShell’s wonderful HTML parsing to do some heavy lifting here, by leveraging the HTMLWebResponseObject‘s useful ParsedHTML.getElementsByClassName method.
So, to select only the element in the body with the class name of ats-prodBuy-inventory, I’ll run:
Much easier to read. So, now I know that the innerText or outerText properties will let me know if the product is in stock or not. To validate, I took a look at another product which was in stock, and saw that it was the same properties.
All that remained was to take this few-liner and and convert it into a script which will loop once every 30 mins, with the exit condition of when the message text on the site changes. When it does, I’m using a tool I wrote a few years ago Send-PushMessage, to send a PushBullet message to my phone to give me a head’s up!
$url ='http://www.gamestop.com/nintendo-switch/consoles/nintendo-switch-console-with-neon-blue-and-neon-red-joy-con/141887'

While ($($InStock -eq $notInStock)){
$response = Invoke-WebRequest -Uri $url
$classname ='ats-prodBuy-inventory'
$notInStock = 'Currently unavailable online'

$InStock = $response.ParsedHtml.body.getElementsByClassName($classname) | select -expand innertext
"$(get-date) is device in stock? $($InStock -ne $notInStock)`n-----$InStock"
Start-Sleep -Seconds (60*30)
}
Send-PushMessage -Type Message -title "NintendoSwitch" -msg "In stock, order now!!!!"
This is what I’ve been seeing…but eventually I’ll get a Push Message when the site text changes, and then, I’ll have my Switch!
Willing to help!
Are you struggling to extract certain text from a site? Don’t worry, I’m here to help! Leave me a comment below and I’ll do my best to help you. But before you ask, checkout this post on Reddit to see how I helped someone else with a similar problem.
We’re all adventurers. That’s why we wake up in the morning and do what we do in our fields, for that feeling of mastery and uncovering something new. Some of us chart new maps, cross the great outdoors, or climb mountains.
And some of us explore code.
In this post, I’ll outline my own such PowerShell adventure, and show you the tools I used to come out the other side with a working solution. We’ll meet in basecamp to prepare ourselves with the needed gear, plan our scaling strategy and climb the crags of an unknown PowerShell module. We’ll belay into treacherous canyons, using our torch to reveal the DLLs that make Windows work, then chart new ground using DotPeek and eventually arrive on the summit, victorious and armed with new tools.
Basecamp – The Background
I’ve been working through a big MDM roll-out concept for a client recently, looking to use Windows 10’s new mobile device management capabilities as an interesting and resilient alternative to tools like ConfigMgr, for a new management scenario.
I needed to script the process of un-enrolling and re-enrolling devices in MDM, because we expect that a small percentage of devices will stop responding after a time, and want to be prepared for that contingency. This is done by removing and reinstalling a Provisioning Package, which is new management artifact available to us in Windows 10.
Windows 10 1703 Release (the Creator’s update) conveniently has a nice new PowerShell module full of cmdlets we can use for this task!
However, we’re targeting a different release which doesn’t have this module available. When I brought this information to the client, the response was ‘we have confidence that you can make this work’. Let’s break out the sherpa hats!
First things first, I tried just copying and pasting the module folder, but that didn’t work, sadly.
If only there were some way to look inside a cmdlet and see what’s going on under the covers….
Understanding our Gear
We’ll have a few pieces of gear which will be absolutely essential to this expedition.
Tool
Function
Get-Command
Retrieves definition of modules and cmdlets
DotPeek
Decompiler for binaries
Visual Studio Code
Pretty Editor for code screen shots
Looking into a Cmdlet the easy way
Get-Command is definitely the tried and true method of uncovering what a function does and how it works. Time to break out our handy climbing axe and start picking away here.
Take your command and run it through Get-Command <cmdname> | select -Expand Definition. This will show you the compiled version of the cmdlet, which may have some good clues for us.
Any script cmdlets or functions, like the very useful Out-Notepad,will have a field called Definition which shows exactly how the cmdlet works. You can pick up some neat tricks this way.
gcm Out-Notepad | select -ExpandProperty Definition

#this function is designed to take pipelined input
#example: get-process | out-notepad

Begin {
#create the FileSystem COM object
$fso=new-object -com scripting.filesystemobject
$filename=$fso.GetTempName()
$tempfile=Join-Path $env:temp $filename

#initialize a placeholder array
$data=@()
} #end Begin scriptblock

Process {
#add pipelined data to $data
$data+=$_
} #end Process scriptblock

End {
#write data to the temp file
$data | Out-File $tempfile

#open the tempfile in Notepad
Notepad $tempfile

#sleep for 5 seconds to give Notepad a chance to open the fi
sleep 5

#delete the temp file if it still exists after closing Notepad
if (Test-Path $tempfile) {del $tempfile}
} #end End scriptblock
However in this case with our Provisioning Cmdlets, PowerShell was just NOT giving up any secrets.
This will often be the case for binary, or dll-driven cmdlets. We have to climb a little higher to see what’s going on here.
Looking inside a Cmdlet the fun way
When our Command Definition is so terse like that, it’s a clue that the actual logic for the cmdlet is defined somewhere else. Running Get-Command again, this time we’ll return all the properties.
It turns out that the hidden core of this whole Module is this DLL file.
If you’ve been working around Windows for a while, you have definitely seen a DLL before. You may have even had to register them with regsvr but did you ever stop to ask…
What the heck is a DLL anyway?
DLLs are Microsoft’s implementation of a programming concept known as shared libraries.
In shared libraries, common code which might be present in many applications (like dependencies) are instead bundled into a dynamic link library, and loaded into memory once. In this model, many apps can share the same core functionality (like copy and paste) without having to roll their own solution, or needing to reload the same code.
This model allows for smaller, more portable applications while also providing more efficient use of a system’s resources.
TL;DR: if code does contains something really useful that might be needed elsewhere(like procedures, icons, core OS behaviors), store it in a DLL so other things can reference it
And as it turns out, many PowerShell modules do just this!
We can find the path to this module’s DLL by running Get-Command Get-ProvisioningPackage | Select Dll
Now, let’s open it in my editor of choice, Notepad.
Yeah… we’re going to need a different tool.
Choosing a Decompiler
When it comes to picking a decompiler or text editor, if we’re not careful we’ll end up looking like this guy:
I choose mountain climbers because I think their tools look SOO cool. I should buy an ice-axe
There are a lot of options, I worked through .net Reflector and Ida pro before finally stopping on .Peek, by JetBrains. You can download it here. I chose .Peek because it’s free, and not just a free trial like .net Reflector, and it’s very up-to-date and designed with .net in mind. IDA Pro does a good job, but I got the impression that it is SO powerful and flexible that it isn’t as good as a tailor made .net tool.
It is free, as in beer, and is an AWESOME tool for digging into DLL files. Install it, then launch it and click Open.
Next, paste in the path to our DLL file, then expand the little arrow next to the ProvCmdlets assembly.
Here’s a breakdown of what we’re seeing here.
Working our way through this, we can see the loaded Assemblies, or DLL files that we are inspecting. If you expand an Assembly, you’ll see the NameSpaces and Metadata inside it. We’re more concerned with NameSpaces here.
Protip: the References section lists out all of the assemblies (other DLL files) that this assembly references. If you attempt an ill-advised effort to port a module to another version of Windows, you’ll need to bring along all of these files (or ensure they’re the right version) at a minimum to prevent errors.
Inside of NameSpaces, you can see Class definitions. Most binary cmdlets are built around namespaces, and will often match the format of the cmdlets themselves.
Since I’m interested in seeing what happens when I call the Install-ProvisioningPackage I’ll take a look at the Class definition for the InstallProvisioningPackage Class by clicking the arrow.
This shows us the Methods and the Params that the class exposes.
We can also double-click the cmdlet itself to see the full source code, which is shown below. I’ve highlighted the Action bits down below on line 38.
// Decompiled with JetBrains decompiler
// Type: Microsoft.Windows.Provisioning.ProvUtils.Commands.InstallProvisioningPackage
// Assembly: ProvCmdlets, Version=10.0.0.0, Culture=neutral, PublicKeyToken=null
// MVID: 2253B8FF-A698-4DE9-A7F2-E34EDF8A357E
// Assembly location: C:\Windows\System32\WindowsPowerShell\v1.0\Modules\Provisioning\provcmdlets.dll

using Microsoft.Windows.Provisioning.ProvCommon;
using System;
using System.IO;
using System.Management.Automation;

namespace Microsoft.Windows.Provisioning.ProvUtils.Commands
{
[Cmdlet("Install", "ProvisioningPackage")]
public class InstallProvisioningPackage : ProvCmdletBase
{
[Parameter(HelpMessage = "Path to provisioning package", Mandatory = true, Position = 0)]
[Alias(new string[] {"Path"})]
public string PackagePath { get; set; }

[Parameter]
[Alias(new string[] {"Force"})]
public SwitchParameter ForceInstall { get; set; }

[Parameter]
[Alias(new string[] {"Quiet"})]
public SwitchParameter QuietInstall { get; set; }

protected override void Initialize()
{
this.PackagePath = Path.IsPathRooted(this.PackagePath) ? this.PackagePath : Path.GetFullPath(Path.Combine(this.SessionState.Path.CurrentFileSystemLocation.Path, this.PackagePath));
if (File.Exists(this.PackagePath))
return;
this.ThrowAndExit((Exception) new FileNotFoundException(string.Format("Package '{0}' not found", (object) this.PackagePath)), ErrorCategory.InvalidArgument);
}

protected override void ProcessRecordVirtual()
{
this.WriteObject((object) PPKGContainer.Install(this.TargetDevice, this.PackagePath, (bool) this.ForceInstall, (bool) this.QuietInstall), true);
}
}
}
It feels familiar… it feels just like an Advanced Cmdlet, doesn’t it? PowerShell has been sneakily tricking us into becoming Programmers, yet again!
Once we scroll past the param declarations, we can see this cmdlets Initialize() method determines if the user provides a valid package path, then .ProcessRecordVirtual() gets called.
This line of code determines which params have been provided, then calls the PPKGContainer class to use that class’ Install() method. Let’s right-click on PPKGContainer , then ‘Go To Declaration’ to see how that works!
Higher and Higher
The PPKGContainer useful class is actually defined in a separate DLL file, Microsoft.Windows.Provisioning.ProvCommon, and contains a number of its own methods too. We are concerned with Install().
public static ProvPackageMetadata Install(TargetDevice target, string pathToPackage, bool forceInstall, bool quietInstall)
{
{...}
int num = target.InstallPackage(pathToPackage, quietInstall);
There’s a lot to unpack here. When this method is called, the cmdlet creates a new TargetDevice object, and refers to it as target, as seen in line 1. Then, down on line 4, we call the target's own InstallPackage() method.
That means just one more step and we’ll finally be there, the summit of this cmdlet. We right-click on TargetDevice and then ‘Go to implementation’ and then hunt for the InstallPackage() Method. Here it is y’all, feast your eyes!
Oh man, there’s a lot going on here…but if we pare it all away we see that it takes params of a path to the PPKG file, and then a switch of QuietInstall. And then we…resolve the path to PROVTOOL.exe…huh, that’s weird.
Next…we build a string with the path to the file…then add’s a ‘/quiet' to the string…oh no, I see where this is going. Surely the RemovePackage method is more advanced, so let’s take a look at that!
Double-clicking on TargetDevice, we can then scroll down to the RemovePackage method to see how this one works.
We’re so close now guys, I’ve got a feeling that this will be worth it!
The closest thing that I could find to a fox in a winter coat.
The Summit
What do we actually see at the very top of this module? The true payload, hidden from all eyes until now?
That’s it? It just calls ProvTool.exe <pathtoFile.ppkg> /quiet?
I dunno, I expected a little more, something a bit cooler. It’s like climbing Mt Fuji to see only this.
Image Courtesy of WaneringVegans
Well, after hours of work, I certainly had to see what happened if I just ran that exact command line on another machine. What if we just try that on another machine? Only one way to find out.
I ran it and then pulled the Windows EventLogs and…It worked!
That’s it kids, the Tooth Fairy ain’t real, I’m beginning to have some doubts about Santa, and sometimes deep, deep within a module is just an old unloved orphan .exe file.
Thanks DotPeek, I guess.
Where do we go from here?
I hope this post helped you! Later on, I’ll be looking for other interesting PowerShell modules, and hope to learn about how they work under the covers! If you find anything interesting yourself, be sure to share it here with us too! Thanks for reading!
Want to read more about Climbing Mt. Fuji? Check these out:
And in this post we will dig further into the options available to us to deploy a Provisioning Package with the goal of allowing for silent MDM Enrollment and Silent application of a provisioning package!
Why are we doing this?
In my situation, my customer is deploying Win10 Devices managed with Air-Watch in order to use the native Windows 10 MDM client, but we need an easy way to enroll them into Air-Watch when they boot!
You can use the Windows Image Configuration Designer tool to capture all of the settings needed to enroll a device, then bake them into a Provisioning Package which an end-user can double-click and and enroll after a short prompt.
However, for our purposes, devices arrive built and ready for service at our endpoints, so we needed to examine other approaches to find a path to truly silent enrollment!
Prerequisites
First things first, you’ll need to be signed up for an MDM Service. In this guide I’ll assume you’re signed up for Air-Watch already (I’ll update it later with InTune once I am able to get this working as well)
From the Air-Watch console, browse to Settings \ Devices \ Windows \ Windows Desktop \ Staging & Provisioning. You’ll see the necessary URLs.
Make note of these and fire up Windows Imaging Configuration Designer. You can obtain this via the Windows Store on Windows 1703 or higher . It also ships as part of the Windows ADK as well, and if you want to bake a Provisioning Package into a Windows Image, you’ll need that.
Click ‘New Simple Provisioning Package’ and provide a name for this project.
This screen gives you a nice taste of some of the things you can do in a PPKG, but we are going to be digging deeper into the options, so click ‘Switch to Advanced Editor’
Click ‘All Settings’ under Available Customizations at the top, then scroll down to Runtime Settings \ Workplace \ Enrollments
Fill this in with the info we noted from the AirWatch screen earlier.
At this point, we’re ready to export the Provisioning Package and think about our options for distribution.
Click Export, then Provisioning Package.
For now, we can Next, Next, Finish through the wizard.
and the output is two files, a .PPKG and a .CAT file. The Cat is a Security Catalog file, which is a management artifact which contains signatures for one or many files.
For 99% of your PPKG needs, you don’t need to worry about the .CAT file, just deploy the PPKG file and away you go.
How to distribute Provisioning Packages
We have a number of ways we can distribute this file, but this cool thing about it is that once invoked, the user is going to get automatically enrolled into MDM Management! Here are our options, which we’ll cover for the rest of the post:
EASY – Send to Users
If you’re in a normal environment with users able to follow basic instructions (big assumption ) you can just e-mail the PPKG file out to your end users and instruct them to double-click it. They’ll be presented with the following prompt, which will enroll them in MDM and along they go.
However for my purposes, this wasn’t a viable option. We’d heard about automatic provisioning being available at image time, so we decided to take a look into that approach.
Apply at OOBE
If you’re not familiar with the term, OOBE is the Out-Of-Box-Experience. It’s a part of Windows Setup and can be thought of as the ‘Getting Devices Ready’ and Blue-background section of OS install, in which the user is asked to provide their name, password, etc.
Well, it turns out that if the PPKG file is present on the root of a Flash Drive or any volume during OOBE, the user will be automatically triggered and prompted to accept the package!
Protip: If your PPKG isn’t automatically invoked, hit the Windows Key Five times when at the ‘Let’s Pick a Region’ Screen.
However, this STILL requires someone to do something…and assumes we’ll have a keyboard attached to our systems. This would be good for schools or other ‘light-touch’ scenarios, but was a non-starter for me, onto the next approach.
Bake into Image
You can also just bake all of your Provisioning Settings directly into an image too. Going back to WICD you can choose ‘Export Production Media’ and follow the wizard, which will create a .WIM file structure. You can then deploy that with MDT, SCCM or (ugh) ImageX. However, if you want to convert this into a .WIM file, follow Johan’s wonderful guide to the topic here.
Pro-tip: Note that in the PowerShell example there, you’ll need to change line 19 to match the desired path you specify in line 3.
If you have access to your hardware while imaging, this is a great strategy. You could even use the ‘Apply Provisioning Package’ step as an alternative method to enroll devices.
Truly Silent Deployment – Signed PPKGs
Finally, the real reason for this post. We order customized hardware from a vendor tailored for our needs but couldn’t use any of the methods covered here. However…we CAN leverage a PKI instead.
Note: For ease of testing, this guide will cover using a Self-Signed Certificate instead. However, you can easily do this using an internal Public Key Infrastructure if you have one available.
To outline what we’ll do here:
On WICD Workstation
Create a Code-Signing Cert
Move a copy of it into your Trusted Root Cert Authorities
Export a .cer copy of the cert
Sign your PPKG
On Base image or on each computer
Import .cer file into Trusted Root Cert Authority
Move copy into Trusted Provisioners Store
Execute the PPKG, which will run silently
GIANT DISCLAIMER: This approach is VERY tricky and has a lot of moving parts. It’s easy to get wrong and has been mostly replaced by a new PowerShell Module titled ‘Provisioning’ which ships with Windows 10 1703 (Creators update ) release. This cmdlet makes it a snap!
`Install-ProvisioningPackage -QuietInstall`
If you have that module / option available, you are advised to use it instead of the Signed PPKG approach.
Are you still here with me? Then you’re my kinda coder!
On our PPKG Creation Computer
First, let’s create a new CodeSigning Certificate, then export a .cer version of it, which we reimport into Trusted Root Cert Authorities. We’re doing these steps on the workstation where we build our Provisioning Packages.
You’ll see this prompt appear, asking if you’re really super sure you want to add a new Trusted Root Certificate Authority. Say Yes.
With these steps done, fire up WICD again and go to Export Provisioning Package.
Provide a name and Version Number like normal and hit next. The video below guides us through the rest.
Talking through that, in the next page, choose the Certificate to sign it. This needs to be the same cert that will be trusted on your end computers as well. If you don’t see your cert listed, make sure (for Self-Signed) that it’s also in your Trusted Root Cert Authority. If you’re using PKI, be sure you have an authorized Server Auth or Code Signing Cert present from a CA that your computer trusts.
Copy the .cat and .PPKG file. Yep, we must have the .CAT file this time, don’t forget it.
Preparing the image
Now, for our end-user actions. There are a lot of ways to do this but the easiest way to do it is in your Windows Image before capturing it.
Take the cert we created earlier called DistributeMe.cer and push this out to your end computers. You need to import this Into the Trusted Root Cert Authority & the hidden Trusted Provisioners Cert store, which is ONLY available via PowerShell and NOT the Certificate Manager snapin.
Now, you can run SysPrep or otherwise capture this image, and the changes will persist. You could also run these steps by running a PowerShell script with SCCM, MDT, GPO or whatever you want.
With all of these steps in place, check out what happens when you invoke the Provisioning Package now!
Conclusion
Of course, in the cosmic ironies of the universe, the same week I worked through how to get Silent Enrollment working…AirWatch released a brand new .MSI based enrollment option which installs the AirWatch agent and handles all enrollment for you…but I thought that this must be documented for posterity.
Big, big thanks go to Microsoft’s Mark Kruger in the Enterprise Security R&D Team. Without his advice, I would never have been able to get this working, so thanks to him!
We’re counting down here at FoxDeploy, about to reach a traffic milestone (1 Million hits!) , and because I am pretty excited and like to celebrate moments like this, I had an idea…
It turns out that this is the La Metric Time, a $200 ‘hackable Wi-Fi clock’. It IS super cool, and if I had one, I could get this working in a few hours of work. But $200 is $200.
I then remembered my poor neglected rPi sitting in its box with a bunch of liquid flow control dispensers and thought that I could probably do this with just a few dollars instead(spoiler:WRONG)!
It’s been a LONGGG time since I’ve written about Windows IoT and Raspberry Pi, and to be honest, that’s mostly because I was getting lazy and hated switching my output on my monitor from the PC to the rPi. I did some googling and found these displays which are available now, and mount directly to your Pi!
Join me on my journey as I dove into c# and buying parts on eBay from shady Chinese retailers and in the end, got it all working. And try to do it spending less than $200 additional dollars!
Necessary Materials
To properly follow along, you’ll need a Raspberry Pi of your own. Windows 10 IoT will work on either the Raspberry Pi 2B + or Raspberry Pi 3, so that’s your choice but the 3 is cheaper now. Click here for one!
You’ll also need a micro SD card as well, but you probably have one too. Get an 8gb or bigger and make sure it is fast/high-quality like a Class 10 Speed card.
Writing an SD Card is MUCH easier than it was in our previous post. Now, it’s as simple as downloading the ‘IoT Dashboard‘ and following the dead simple wizard for Setting up a new device. You can even embed Wi-Fi Connections so that it will connect to Wi-Fi too, very cool. So, write this SD Card and then plug in your rPi to your monitor or…
Optional Get a display:
There are MANY, many options for displays available with the Raspberry Pi and a lot of them work…in Linux. Or Raspbian. Or PiBuntu or who knows what. A lot of them are made by fly-by-night manufacturers who have limited documentation, or worse, expansive documentation that is actually a work of fiction. I’ve bought and tried a number of them, here is what I’ve found.
Choosing the wrong display and hating your life
First out the gate, I saw this tiny little display, called the “LCD MODULE DISPLAY PCB 1.8 ” TFT SPI 128 x 160″. I immediately slammed that ‘BUY’ button…then decided to look it up and see if it would work.
It’s literally the size of a postage stamp
While it works in some Linux distros I could not make it work with Windows 10 IoT, as it just display a white screen. It is well, well below the supported minimum resolution for Windows (it could barely render the start button and File Explorer icon on the start bar, in fact, if we could even get it working) so it was no surprise. There’s $10 down the drain.
Kind of off to a rocky start, at 25% of the price of the bespoke solution…surely, spending more money is the way out of this mess.
This one easily worked in Raspian, but at such a low res, I could never get it to display a picture in Windows, just a white screen, indicating no driver. I contacted the manufacturer and they confirmed support for Linux (via a driver written in Python!) but no Windows support. At $35, it was more painful to box up,
From what I can tell, these are both Chinese counterfeits of displays made by WaveShare. So at this point I decided to just legitimately buy the real deal from WaveShare, since they mention on their site that the screen does work with Windows 10 IoT.
If you’re doing the math, I was halfway there to the full solution already in pricing.
Wife: You spent HOW MUCH on this post?!
Choosing the right monitor and a sigh of relief
I eventually ponied up the dough and bought the 5inch HDMI LCD V2 800×480 HDMI display. This one uses the HDMI connection on the rPi and also features a touch screen. The screen even works with Windows 10 IoT!
It implements touch via a resistive touch panel rather than the standard capacitive touch. And no one has written a driver for the touch panel So, it works, and it is a great size for a small project, but it doesn’t have touch. At this point, I decided that this was good enough.
When I connected this display, I saw scrolling lines which changed patterns as the content on the screen changed.
This is a great sign, as it means that Windows is rendering to the display, but at the wrong refresh rate or resolution.
To fix this, remote in to your Raspberry Pi via the admin$ share, and change the Video section of your C:\EFSIS\Config.txt file. Once you’ve made the change, reboot the device and display will just work!
#
# Video
#

framebuffer_ignore_alpha=1  # Ignore the alpha channel for Windows.
framebuffer_swap=1          # Set the frame buffer to be Windows BGR compatible.
disable_overscan=1          # Disable overscan

hdmi_cvt 800 480 60 6 0 0 0 # Add custom 800x480 resolution (group 2 mode 87)
hdmi_group=2                # Use VESA Display Mode Timing over CEA
hdmi_mode=87
What we’re doing here is adding a new HDMI display mode and assigning it the numerical ID of 87 (since Windows ships with 86 HDMI modes, and none are 800 x 480!) and then telling windows to use that mode. With all of these changes in place, simply restart your Pi and you should see the following
At this point I decided that I ALSO wanted touch, so I bought the 7″ model too (jeeze how much am I spending on this project??). Here’s that one WaveShare 7inch HDMI LCD (C ).
I’ll follow up on this later about how to get touch working. Update: scroll down to see how to enable the 7″ display as well!
Here’s my current balance sheet without the 7″ display included. Don’t wanna give my wife too much ammunition, after all.
Intentionally not adding the last display to this list (and hiding credit card statements now too)
So, now that we’ve got our Pi working, let’s quietly set it off to the side, because we’ve got some other work to do first before we’re ready to use it.
I love this screen! I wholly recommend using this display for your Pi, it has built in touch which is 100% supported, it’s also a capacitive touch model with fused glass, so it looks like a high-end smart phone screen. It’s super sexy.
If you buy this one, you can actually enable support for the screen when you first record the Win10 IoT image. To do this route, when you write the OS onto the SD Card, open explorer and go to the SD Card’s EFIESP partition.
If your Pi is on and the screen is off, or displaying scan-lines, you can hop in through the admin share instead. Go to \\ipaddress\c$\EFIESP if you’re in that situation
Next, open Config.txt and add or change the final few lines to match this below. Again only if you bought the 7″ display. If you bought a different HDMI display, you can simply change the resolution to match.
init_uart_clock=16000000    # set uart clock to 16mhz
kernel_old=1                # load kernel.img at physical memory address 0x0

safe_mode_gpio=8            # a temp firmware limitation workaround
max_usb_current=1           # enable maximum usb current

gpu_mem=32
hdmi_force_hotplug=1        # enable hdmi display even if it is not connected
core_freq=250               # frequency of gpu processor core in mhz

framebuffer_ignore_alpha=1  # ignore the alpha channel for windows.
framebuffer_swap=1          # set the frame buffer to be windows bgr compatible.

disable_overscan=1          # disable overscan
hdmi_cvt 1024 600 60 6 0 0 0 # Add custom 1024x600 resolution (group 2 mode 87)

hdmi_group=2                # Use VESA Display Mode Timing over CEA
hdmi_mode=87
It’s that simple. Be careful using this method, because if you go to the Device Portal on the device and check the Resolution settings there, our custom HDMI mode will not be displayed. Fiddling with the settings in Device Portal can force your Pi to reboot and erase your settings, forcing you to go through this process again.
Getting Started with C#
Windows 10 IoT can run apps written in JavaScript, Python and C#. It can also run PowerShell remoting as well, but if you go that route we cannot use the typical PowerShell and XAML approach we’ve been doing. And a GUI was crucial to this whole project. So, for the first time ever, we are going to write this natively in c# and XAML.
Since I was just getting my toes wet, I decided to start super simply with a basic hello world console app in C#. I followed this guide here. Soon enough, I had my own hello world app! Launch Visual Studio, make a new Project and then choose Visual C# \ Console Application. Then, erase everything and paste this in.
// A Hello World! program in C#.
using System;
namespace HelloWorld
{
    class Hello
    {
        static void Main()
        {
            Console.WriteLine("Hello Foxy!");

            // Keep the console window open in debug mode.
            Console.WriteLine("Press any key to exit.");
            Console.ReadKey();
        }
    }
}
If you look through the code, it’s not THAT far away from PowerShell. Sure there are way more nested code blocks than we’d normally have in PowerShell, but essentially all we do is call Console.WriteLine() which is the c# equivalent of Write-Host, and provide an overload which is written to the screen. Then we end this by waiting for the user to hit something with Console.ReadKey();.
I hit Compile (F5) and boom!
What does using mean?
C# makes use of Namespaces. Namespaces are a way of organizing code into different modules that might be importable (on systems that don’t have them, you could add new namespaces with DLLs or by installing software) and prevents code collision. Our new program begins with using System; (called a directive, we’re directing our program to use the System namespace), which contains a lot of cool functions we need, such as Console.WriteLine(). If we didn’t begin the code by importing the System Namespace we’d have to writeSystem.Console.WriteLine() everytime, instead of just Console.WriteLine().
With that out of the way, and now that we are C# experts (let’s pause and add ‘Developer’ to our LinkedIn and StackJobs profiles too) I decided to move on to a basic WebRequest, following this great example.
Babies first WebRequest
I copied and pasted the demo and hit F5, only to see that this is pretty boring, essentially just loads the Contoso page and displays the HTTP status code. That, frankly will not fly.
To spice things up a bit under the covers, I decided to instead hit the awesome JSONTest.com page, which has a bunch of nifty test endpoints like ip.JSONTest.com. Hitting this endpoint will give you back your public IP address. Nifty! I simply changed the URL on line 18 to string url ="http://ip.jsontest.com"; and BOOM smash that F5.
using System;
using System.Collections.Generic;
using System.Linq;
using System.Text;
using System.Net;
using System.Web;
using System.Threading.Tasks;
using System.IO;

namespace WebHelloWorldGetIp
{
    class Program
    {
        static void Main(string[] args)
        {

            string url = "http://ip.jsontest.com/";

            HttpWebRequest request = (HttpWebRequest)WebRequest.Create(url);

            request.Credentials = CredentialCache.DefaultCredentials;
            // Get the response.
            WebResponse response = request.GetResponse();

            // Display the status.
            Console.WriteLine(((HttpWebResponse)response).StatusDescription);
            // Get the stream containing content returned by the server.
            Stream dataStream = response.GetResponseStream();
            // Open the stream using a StreamReader for easy access.
            StreamReader reader = new StreamReader(dataStream);
            // Read the content.
            string responseFromServer = reader.ReadToEnd();

            // Write the response out to screen
            Console.WriteLine(responseFromServer);

            //clean up
            reader.Close();
            response.Close();

            //Wait for user response to close
            Console.WriteLine("Press any key to exit.");
            Console.ReadKey();
        }
    }
}
How different things are…
A quickly little note here, as you may have noticed on line 19, when we created a variable with string url=".." we had to specify the type of variable we want. PowerShell was dynamically typed, meaning it could determine the right type of variable for us as we go, but C# is NOT, it is statically typed. Keep this in mind, furthermore where PowerShell was very forgiving and case insensitive, C# is case sensitive. If I define string name = "Stephen" and then later write Console.WriteLine("Hello " + NAME ); I will get an error about an undefined variable.
We hit F5 and…
Sweet! Now we’ve done a working webrequest, the next step is to swap in the URL for WordPress’s REST API and see if we can get stats to load here in the console. If we can, then we move the code over to Windows 10 IoT and try to iron out the bugs there too.
Querying WordPress from C#
In my usage case, I wanted to query the WordPress API, and specifically the /Stats REST Endpoint. However, this is a protected endpoint and requires Authentication as we covered in a previous post on oAuth.
WordPress handles Authentication by adding an Authorization property to the header, which is simply a key value pair of this format
Then I spiff things up a bit more as seen here (mostly adding a cool Fox ascii art), and get the following results:
This is nice, but it’s JSON and I want just the numerical value for Hits.
Visual Studio 2013 and up integrates Nuget right into the IDE, so it’s very easy to reference awesome community tools. We’re going to add NewtonSoft JSON to the project, following the steps seen here.
With that in place, all we have to do is create a new jObject which has a nifty .SelectToken() method you use to pick an individual property when you parse JSON.
Alright, now all I have to do is make a GUI, and port this over to Raspberry Pi–which runs on .netCore and only uses some of the libraries that full dotnet supports–surely that will be very easy, right?
A good stopping point
Phew, this was fun! We learned which components to use (and which to avoid) learned a bit about c# background terminology, and even wrote our first WebRequest, parsing JSON using Nuget packages we installed into our application. This was awesome!
Stay tuned for Part II, dropping later this week! (this will link to Part II when available)


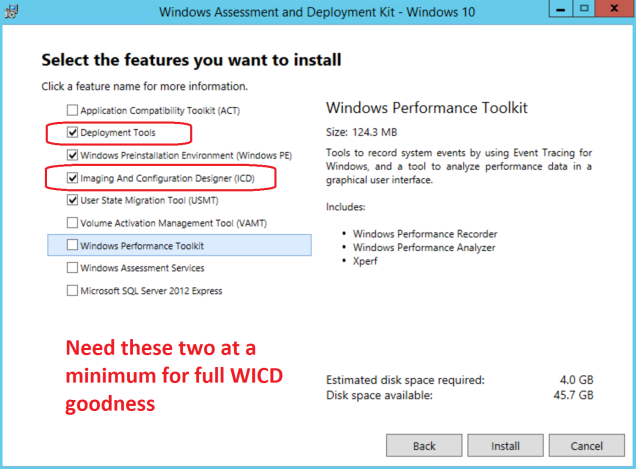
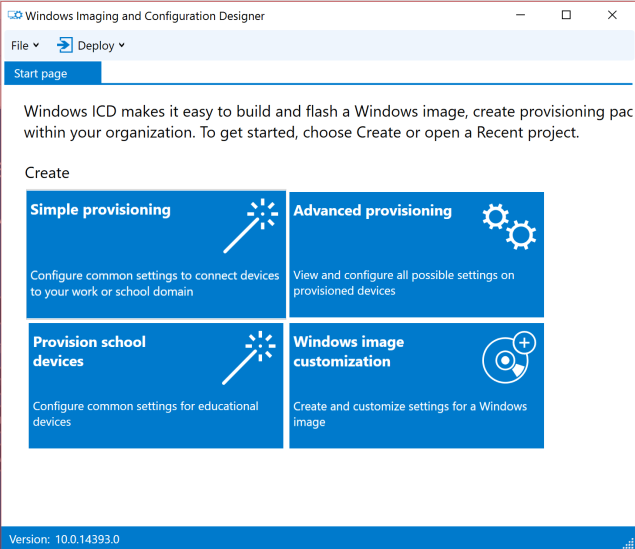
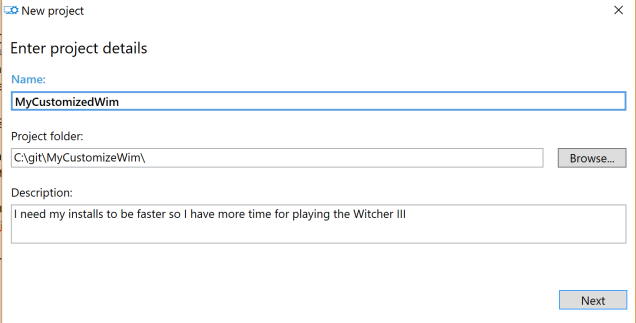


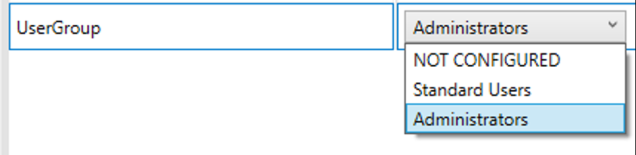


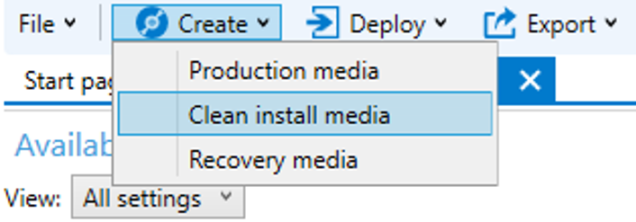


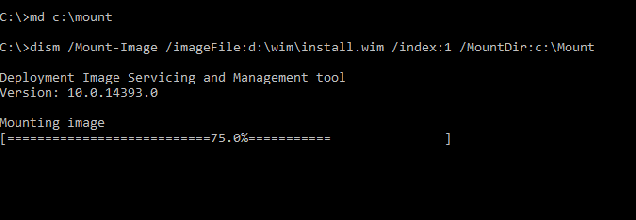


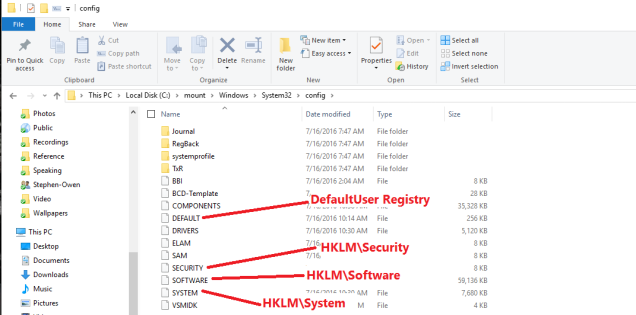
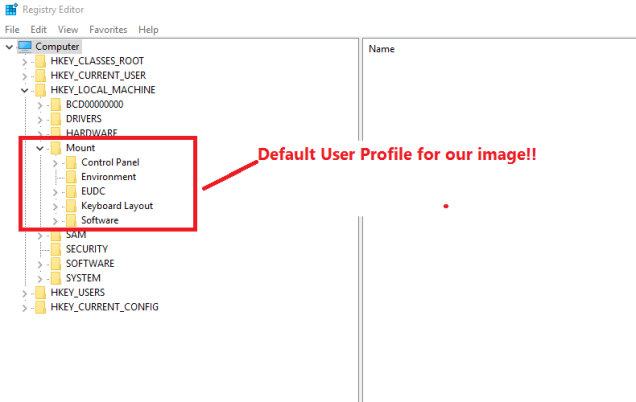


![Factory: No recovery image registered[gle=0x000000ea] Reset: Unsupported WinRE / OS versions[gle=0x000000ea]](http://foxdeploy.files.wordpress.com/2017/01/reset-issue.png?w=636&h=170)


 This kind of request comes up all the time on StackOverflow and /r/PowerShell. “How can I extract content from a webpage using PowerShell”.


 ) you can just e-mail the PPKG file out to your end users and instruct them to double-click it. They’ll be presented with the following prompt, which will enroll them in MDM and along they go.


