Last week, I had an amazing time at the Microsoft MVP Summit, it was a dream come true! Speaking of true, I even got to meet Jim Truher and Bruce Payette! Simply a wonderful, wonderful time.
Probably my favorite part about being there was getting to be on a live podcast recording for TWiT network’s Coding 101 show, along with Sarah Dutkiewicz, Adam Bertram, Jeremy Clark, June Blender, & Jeff Wouters! We got to talk about what got us into coding, how to become an MVP, and our favorite (and worst) interview questions. I feel like I did pretty well, despite my heart trying to pound out of my chest.
This was kicking my butt today, but turns out that it had an easy work around.
I learned a long-time ago that if you’re running Hyper-V on your Device, you should not install a VPN client on the host, but rather should be doing this within child VMs. The reason for this is that sometimes the drivers associated with a VPN adapter don’t play nicely with a hypervisor, and can often result in a blue screen error when they attempt to make changes to the virtual adapters displayed to the parent partition.
So, I made a Windows 10 VM to run my VPN client…however, I was getting errors of ‘Session Ended’, along with tons of murky stuff in my Event Viewer, related to missing devices, etc. It looked pretty scary.
As it turns out this is a simple resolution.
Symptom
A VPN connection is immediately dropped when connecting on a Windows 8 or higher VM
Validation
Launch AnyConnect and click the cog icon, then click the Mesage History tab.
Look for an error of “VPN establishment capability from a remote desktop is disabled. A VPN connection will not be established”.
Cause
When connecting to Windows 8.1 and newer child OSes in Hyper-V, Virtual Machine Connection will actually attempt to connect via RDP, rather than through the secured backchannel that VMC normally offers. This will appear as an RDP session on the remote machine, and AnyConnect is often configured to prohibit this behavior.
Resolution
While connecting to the VPN, use basic connection instead of ‘Enhanced Session’ You can use this button here to toggle between the two, and it’s okay to jump back into enhanced session after the VPN connection in completed.
Super quicky here. With Windows Server Tech preview 4 shipping now, we have a new release of Server Nano to play with. Ben Armstrong wrote a guide for tech preview 3, but the cmdlets have changed since then, so I figured I’d write this out to help you as well!
Recently, I’ve been getting more and more interested in Chef, and decided it was time to build out a testlab in my Hyper-V.
I started imaging a new VM using the 14.10 LTS release of Ubuntu, one of the supported environments for Chef Server.
However, during install, my VM would freeze here:
At the same time, I noticed a critical level event from Hyper-V.
‘Chef’ was faulted because the guest executed an intercepting instruction not supported by Hyper-V instruction emulation. If the problem persists, contact Product Support. (Virtual machine ID 8895146E-C175-4CA5-B7A6-57E1D6E48290)
I did a bunch of googling and found…almost no one with this same issue, and I thought it was related to Hyper-V on Windows 10 Tech Preview. As it turns out, this is caused by some generation 2 Virtual Machine features, namely Dynamic Memory.
Symptom
Install of Ubuntu or other *Nix distro freezes during install on Hyper-V, as a Gen 2 VM
Cause
Dynamic Memory does not appear to be supported during install of Ubuntu, and will manifest as errors during OS Install and Parititoning
Resolution
Disable Dynamic Memory until install is completed. After installing, run ‘sudo apt-get update’ to ensure drivers are up to date, for optimum VM sveltness.
This post is part of the Learning PowerShell DSC Series, here on FoxDeploy. Click the banner to return to the series jump page!
I’ve been pointing people to my series on DSC for a while now, and noticed that my instructions were not 100% accurate, plus I was sending people all over the web to download the needed files to build a Domain Controller using DSC. So, in this post, I’ll provide much simpler instructions to deploying a one-click domain controller.
I’ve also provided some custom versions of the DSC Resources used in this post, which include some code fixes not yet available on the PowerShell Gallery today.
To avoid heart-ache, I would strongly encourage you to use the copies I’m providing with this post.
Now, make sure you have a Windows Server machine ready, running WMF 5.0. If you need it, download it here
Next, extract this to your new Domain Controller to be, under C:\temp.
Copy all of the x$ModuleName folders into $env:ProgramFiles\WindowsPowerShell\Modules on your VM
From an Administrative PowerShell prompt, run: dir -recurse -path $env:ProgramFiles\WindowsPowerShell\Modules | Unblock-File to unblock all files downloaded
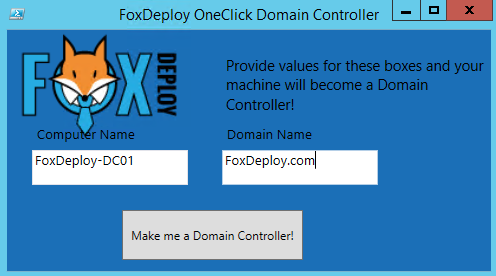
Now, simply launch OneClickDSC.ps1 in PowerShell, and click the Play button (or hit F5), to launch the GUI.
You only have to provide two values. On the left, if you choose to, you can rename your computer. If you choose to do so, you’ll have to reboot before you can complete DSC Application. But DSC will continue after the reboot, so there’s really no worry.
On the right side of the screen, simply type in the domain name for your new Domain.
Now, type in the password of the first domain admin to be created.
That’s it
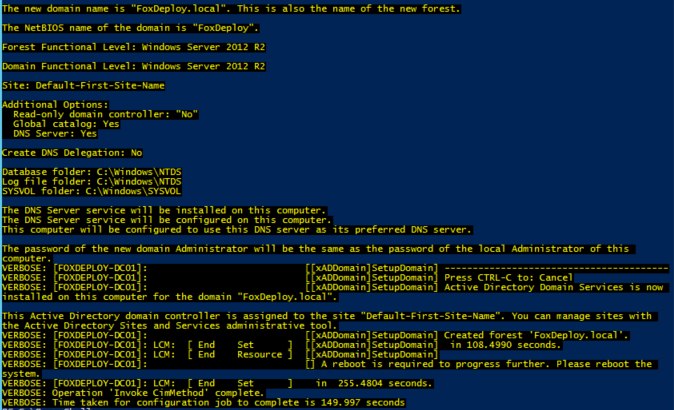
First step for application, is to change the computer’s name. This requires a reboot. So…reboot.
On restart, we can run the following commands to watch the rest of the DSC Application
#Pause the last application
Stop-DSCConfiguration -Force
#Resume so we can watch it
Start-DscConfiguration -ComputerName localhost -Wait -Force -Verbose -UseExisting
Now, if you diverged from using my copy of the DSC resources, you may run into an error, specifically w/ the computername module, around specifying a name for a Computer, without specifying a domain name. This is an open issue in GitHub right now, so hopefully the problem will be resolved soon, but for now, the copy you’ll get w/ this blog post has the proposed fix to the issue.
And…we’re done when we see this screen!
So, I hope this clears up the questions people were asking about how to use this ‘OneClick Domain Controller’.
My next plan is to add SQL support and the prerequisites for SCCM. And then we’ll work up to a one-click ConfigMgr install!
Just a reminder, the new venue will not be ready until next months’ meeting, so please meet us instead at the Microsoft office in Alpharetta, Microsoft Corporation
1125 Sanctuary Pkwy Ste 300, Alpharetta
Join usTONIGHT, December 8th when June Blender will be giving a talk on PowerShell Events! This will be in the Microsoft office in Alpharetta, near the mall! Wear your Santa hats for a special door prize!
About June Blender
June Blender is a technology evangelist for SAPIEN Technologies, Inc. Formerly a Senior Programming Writer at Microsoft Corporation, she is best known for her work with the Windows PowerShell product team from 2006-2012, developing the help system and writing the Get-Help help topics for PowerShell 1.0 – 3.0. In other roles, June wrote content for the Azure Active Directory SDK and Azure PowerShell Help, Windows Driver Kits, Windows Support Tools, and Windows Resource Kits. She lives in magnificent Escalante, Utah, where she works remotely when she’s not out hiking, canyoneering, or convincing lost tourists to try Windows PowerShell. She is a Windows PowerShell MVP, a PowerShell Hero, an Honorary Scripting Guy, and a frequent contributor to PowerShell.org. Contact her at juneb@sapien.com and follow her on the SAPIEN Blog and on Twitter at @juneb_get_help
We had a big issue at a client recently, which was quite a bear to solve. They used ADFS with On-premise SSO (meaning that they didn’t use DirSync to push passwords into Azure AD/Office 365), so when clients come to authenticate over the web via the Company Portal App, they were referred to our on-prem ADFS for authentication.
This worked fine for our iOS and Windows Devices, no issues at all! But then when we tried to use Android devices, they would be presented with the following error message:
The Symptom
Could not sign in. You will need to sign in again. If you see this message again, please contact your IT Admin.
Don’t you love those messages that tell you to contact yourself?
From the InTune app, you can obtain logs by clicking on the ‘…’ hamburger menu. Opening the log, we see the following errors.
Authentication failed. Current state: FailedToAcquireTokens
Failed to acquire Graph token from AAD.
SignInService.access$900(SignInService.java:44)
SignInService$AadFailureAction.exec(SignInService.java:464)
SignInService$AadFailureAction.exec(SignInService.java:444)
GraphAccess$GraphTokenFailureDelegate.exec(GraphAccess.java:190)
GraphAccess$GraphTokenFailureDelegate.exec(GraphAccess.java:174)
AdalContext$AdalAuthenticationRetryCallback.onError(AdalContext.java:228)
com.microsoft.aad.adal.AuthenticationContext.waitingRequestOnError(AuthenticationContext.java:899)
com.microsoft.aad.adal.AuthenticationContext.onActivityResult(AuthenticationContext.java:758)
com.microsoft.windowsintune.companyportal.authentication.aad.AdalContext.onActivityResult(AdalContext.java:150)
com.microsoft.windowsintune.companyportal.views.AadAuthenticationActivity.onActivityResult(AadAuthenticationActivity.java:57)

Code:-11 primary error: 3 certificate: Issued to: CN=adfs.company.com,OU=E-Commerce,O=Company,L=Somewhere,ST=Georgia,C=US;
Issued by: CN=Symantec Class 3 Secure Server CA - G4,OU=Symantec Trust Network,O=Symantec Corporation,C=US
on URL: https://adfs.company.com/adfs/ls/?wfresh=[...]
The Reason
The error occurs when the Company Portal app checks our certificates on ADFS to see if we are trustworthy.
The issue is that Android handles cert chaining in a way somewhat differently from iOS and Windows Phone. In short, Android needs all of our certs to be present on our ADFS Servers, where iOS would intelligently lookup the Cert Signer for us.
The Fix
Import the certs up the chain into the intermediate store on the ADFS Proxies themselves.
So, launch the MMC and add the Certificates Snapin for the Local Computer on your ADFS Server. Find the cert your ADFS Service is using (likely issued to adfs.yourcompany.com), and view it’s parent certificate.
Move a copy of the ‘parent’ cert, (in my case, Symantec) into the Computer\Intermediate Certification Authorities\Certificates store. This part is CRUCIAL!
Next, move copies of your ADFS, ADFS Decrypting, and ADFS Signing Certs into the Personal Store for the ADFS Service.
Finally, restart the ADFS servers, because restarting the service alone is not enough.
With all of this finished, I’m finally able to enroll Android devices into InTune.
On a recent InTune deployment, we had a requirement to force encryption and security on mobile devices and also provision mail profiles as well.
During the pilot, we heard informal reports that a user thought they couldn’t send a photo using their company e-mail after migration, but we found this hard to reproduce.
However, during the production roll-out, we discovered that users were unable to add attachments using their InTune configured mail account.
Note that this was an ConfigMgr w/ InTune deployment, and the affected devices were mostly iOS and Android devices.
How do I fix this?
You control this setting from ConfigMgr, so launch the console.
Browse to Assets\Compliance Settings\Company Resource Access\E-mail Profiles
Open Mail Profile
Check the Synchronization Settings tab and ensure the ‘Allow email to be sent from third-party applications’ checkbox is checked.
Will mobile devices reflect this change?
YES! The next time your devices check in for policy, they will note the change and the InTune MDM agent will allow your users to add attachments and send e-mail from other applications again.
How do I force update of my iOS and Android Devices?
If you’re reading this, chances are that you forgot to make this change, and are wondering precisely how screwed you might be.
You’re OK!
Mobile Devices refresh their policy in accordance with the Default Device Policy setting in SCCM itself, and respect no other client setting. You can alter this setting under Administration\Client Settings\Default Settings.
The value you want is under Client Policy\Client policy polling interval (minutes)
The default Setting is 60 minutes, meaning that the device will phone home every hour. You could ratchet this setting down to 5 minutes, but your devices in the field will still only check-in once an hour or so.
Once they note the change devices will automatically remediate themselves. So you’re OK!
How do I force a single device to update policy?
You can force a single Device by launching the Company Portal application. In the app, click on ‘devices’ and then click Sync. Assuming good data coverage, this process takes roughly five minutes.
How does InTune Conditional Access Policy affect devices in the field? (e.g. Bob’s phone already has a manually configured mail profile. What happens to Bob’s e-mail when I enforce Conditional Access (i.e. saying a user must have InTune to receive e-mail?))
The Background
Consider this: A company with ~1000 mobile devices. They roll out InTune with SCCM and get it installed on 90% of devices in the field, and use it to push e-mail profiles to devices using Conditional Access.
However, 10% of the devices don’t have InTune, but still have manually configured e-mail profiles, using either the built-in mail client (Exchange Active Sync or EAS) or the Outlook application.
The company wants to lock down mobile e-mail to only those with a healthy device, one with security policies being enforced. If you’ve got SCCM w/ InTune installed, you just go to the Microsoft Intune portal at (manage.microsoft.com) to enable Conditional Access.
We enabled the connector, and then applied a security policy to a custom group with our accounts in it.
IT are ALWAYS the guinea pigs
This is really awesome, because you can test your policies VERY easily before rolling it out to the environment at large. I didn’t show it in this screen shot, but you can also link to an AD Security Group of your super special VIP users, and totally omit them from Conditional Access. This is a great idea for job security.
Now, the question from the customer was ‘what will happen to phones in the field without InTune?’
Microsoft presents this helpful chart to help us understand what will happen…
Notice: this totally leaves out preconfigured accounts. It’s only talking about new accounts!
However, this doesn’t really tell us what would happen to devices in the field with e-mail today, but with no InTune. From the looks of the chart, one might think that a new profile would be blocked, while an existing mailbox might be fine. That’s actually what I was expecting.
Now, if there is a device out there which has already been whitelisted in Exchange or Office 365, which policy wins?
So, it LOOKS like InTune should replace my Exchange Policies, so long as I’m in the right group, right?
The Test
We’re testing four scenarios:
• iOS device w/o Intune and a manually created mail profile
• iOS device w/o Intune and Outlook mail app
• Android device w/o InTune and a manually created mail profile
• Android device w/o InTune and Outlook mail app
The Results
Surprisingly, InTune conditional access was awesome, and pretty much just worked exactly as I hoped it would!
iOS device w/o Intune and a manually created mail profile
This was an iOS device, and roughly within five minutes of enabling Conditional Access for this group, we saw this email, promprting us to sign up for InTune
Result new mail blocked, user received email prompt to enroll in InTune
iOS device w/o Intune and Outlook mail app
This was an iPad, and we got a REALLY nicely designed prompt to enroll in InTune from within the app! Really well made, probably the best experience.
Result: new mail blocked, user received very nice notification from within app to enroll in InTune
Android device w/o InTune and a manually created mail profile
Pretty similar to our iOS experience for this LG phone. I bet if this were a Samsung device, we’d have an even better experience, as Knox integration is MUCH better than Android support for any other brand. (Note: I don’t have a screen shot of this one, but it was pretty much identical to the iOS scenario)
Android device w/o InTune and Outlook mail app
I’ve got to say, Microsoft hit the ball out of the park for this one too.
Again, really nice experience for our LG phone when we were using the Outlook app.
The Conclusion
My experience with Conditional Access in InTune w/ SCCM has been fantastic so far. I was hesitant, expecting that it, uh, might not be ready for prime time, given the rapid development of the product still. For this 6,000 seat customer, it was a huge success!
Every time you migrate from one SCCM instance to another, or if you have to move your drivers around (for instance: you originally had your drivers placed on the c:\ and want to mover them to another drive), you’ll need to update the location not only of DriverPackages, but also of all drivers as well.
This has been something that I MIGHT have forgotten more than once. More than twice even.
So I wrote up this script.
This script assumes that you’ve already moved your drivers from their original location to their final resting place. It also supports adjusting the path based on driver folder as well. I’m a firm believer that SCCM Drivers should be stored in as small a folder structure as is possible, here’s how I normally layout my content for SCCM:
Type Of Content
Location
Shared Path
All SCCM Content
D:\ContentSource
\\SCCM\Content\
Drive Source Files
D:\ContentSource\Drivers
\\SCCM\Content\Drivers
Driver Packages
D:\ContentSource\DriverPackages
\\SCCM\Content\DriverPackages
So when I saw that this instance of SCCM had the content in the C:\ drive, and also had very long path names, I had to truncate things. That’s why in this script, you’ll see separate logic for HP, Dell and Sony Drivers, as we needed to shorten those paths a bit.
Original Path
New Path
Drivers\HP Drivers
Drivers\HP
Drivers\Dell Drivers
Drivers\Dell
Drivers\Sony Drivers
Drivers\Sony
Assuming you’re moving your drivers from one system, to another, simply update the path on lines 8, 16 & 24. If you don’t need to change folders, like I’m doing, then you can delete the three blocks and only use one.
Finally, this will take a LONG, LONG time. We had ~3,000 drivers and it took about three hours or so.
You might be wondering how to control this box in your SCCM 2012 R2 SP1 (or ConfigMgr SP2, pretty much the same thing) deployments.
I’ve finally been able (with the help of my friend and future ConfigMgr MVP nominee, Eric Anderson) to track down precisely what is going on in the confusing world of applications and supersedence in SCCM.
The Scenario
· Machines all had the old version of Java, Java 8 Update 65, which is deployed via either a Task Sequence , or with a firm-wide mandatory advertisement
· We made a new deployment of Java, Update 71, and set this to supersede the old version
· The new version of Java was deployed as Available yesterday, not required, to a small subset of machine (5 or so)
· Today, these machines have all automatically updated to the newest version of Java even though it was an Available deployment!!
Looking into the logs, we see this:
AppIntent –
The Juicy part : Will uninstall/upgrade superseded DTs (deployment types)
Then, in AppEnforce a few moments later-
So, we can observe that the machines saw the new advert, and began to automatically apply it, even though we never checked a box to ‘Automatically upgrade clients’…
Or wait…maybe it is.
As it turns out, the checkbox listed in the screen shot above, this one here:
This option is never actually displayed to the SCCM ADMIN while making a deployment. The check box is conditionally displayed after configuring a deployment, and It’s only shown if the application has a supersede rule specified. If so, the box will appear after completing the New Deployment wizard.
Whether or not the box is checked depends, strangely enough, on if the application supersedence rule was configured before or after the app deployment was created.
The worst part about this is that the checkbox isn’t available for the Admin to control when making the new advertisement, but instead appears after the Deployment Wizard finishes. And deployments can’t be altered after they’re created, so no fixing it afterwards either.
Here’s the scoop: this is either a bug or a serious design flaw in SCCM.
But you still need to know how to control the behavior of supersedence, which actually isn’t too complicated, once it’s laid bare.
To allow users in the collection to upgrade to the new version of an app , without being forced to upgrade
Create the deployment of version 2.0 of the app, THEN create the supersedence relationship.
The app will be available to upgrade, and available for new users but will not be enforced on users of the old application, as shown in this screen shot below:
To automatically upgrade users of the old version to the new version of an app, while allowing others the option of installing it
The only difference here is that you create the supersedence first, and then deploy as available to a collection of computers.
Users in the targeted collection who have the old version of the application will be automatically updated to the new version. Users who do not have the app can install it at will, as expected.
To Recap
It turns out this checkbox is only created after a deployment is made, and not actually presented to the user at all.
If a deployment already exists, and then later a supercedence is created, the checkbox of ‘Automatically upgrade any superceded versions of this application’ will be made visible on the deployment, but not checked.
HOWEVER: If a supercedence is created FIRST, then a deployment is made, the checkbox will be added AND checked. This has the same impact as making a new required deployment, even if the deployment is marked as Available.
Users beware, this could definitely bite someone in the butt.
Dunno what it is, but a lot of SCOM information STILL persists on the web in VB Script and refering to SCOM 2007, when 2012 R2 has been out for YEARS now!
In this blog post, I’ll walk you through monitoring a log file for changes, and throwing an alert if the log file hasn’t changed. And we’ll do it in PowerShell, as the good saint Snover intended.
How to make a two-state monitor in PowerShell
We’re gonna make a monitor, so launch SCOM, and go to Authoring->Management Pack Objects, Monitors. If you don’t see the Authoring tab, you’ve got a baby account and need some added perms.
Right click Monitors and choose add new Unit Monitor.
Pick Scripting – Generic, Timed Script Two State Monitor and find a Management Pack to put this bad boy in.
Give it a name and a description, and then target it to Windows Server Operating System.
FOR GOD’s SAKE DON’T CLICK MONITOR IS ENABLED. If you do this, every instance of Windows Server OS in your company is going to start running this script. You probably don’t want that, and instead only want one or two machines to run the script.
Instead, we’re going to create this in a disabled state, then override it to on in order to pick a single Server OS to be our watcher. This means we’ll pick a PC, and it will run this script for us in whatever frequency we specify later.
Since SCOM is ancient, it still defaults to having an example VBScript, pretty silly, actually.
You can put in your own name up top, I’ll call this “MonitorForTextFileChanges.Ps1′
First, we can provide a param to the script to execute. This is a good idea rather than dumping it into the body of the script, because we can create overrides to later re-use this and target other systems, watching other log files for changes!
Here’s how I’m providing the path to my file. Click Parameters at the bottom:
$FileNetLog = \\someserver\Somefile.txt
Now, for the actual code.
$API = new-object -comObject "MOM.ScriptAPI"
$PropertyBag = $API.CreatePropertyBag()
$LogFile = get-item $FileNetLog

if ($LogFile.LastWriteTime -ge (get-date).AddMinutes(-15)){
    #good, the file has changed, lets emit a positive object
    $PropertyBag.addValue("State", "OK")
    }
    else{
    #no is good, the file hasn't changed, let's emit a fail
    $PropertyBag.addValue("State", "ERROR")
    }

$PropertyBag

#source http://opsit.blogspot.com/2013/11/scom-scripting-basics.html
#source http://www.systemcentercentral.com/forums-archive/topic/monitoring-for-expired-certs-on-windows-2012/#post-217585
#source https://www.reddit.com/r/scom/comments/30iqgl/twostate_powershell_monitor_in_scom_2012_r2/
We hook into the SCOM Scripting host to make a property bag, which is a gross sounding thing that SCOM counts on to understand what’s happening when a monitor is running. This bag will return one property, called State which is specified on either line 7 or 11, and has a value of OK or ERROR.
The code is simple. Create a reference to a file and call it $logFile, then use a simple If Greater or Equal to see if the $logFile.LastWriteTime is greater than this moment, 15 minutes ago. If it IS, return STATE:OK, if it ain’t, return STATE:ERROR. Finally, echo out the $propertyBag so that SCOM knows we’re done with the script.
Finally, let’s tell SCOM how to interpret the values this will be throwing. Proceed on to ‘Unhealthy Expression’.
In this window, we need to tell SCOM which value will be an unhealthy state for this monitor. The syntax is a bit odd. Click Parameter Name and put in Property[@Name='State'], then set the Operator to Equals, and finally for the value, put in ERROR, as seen below.
Next, do the same for Healthy Expression, but set the value to be OK, as seen here.
Finally, verify that the Health Icons make sense, and then proceed to Alerts if you want to throw alerts when this monitor fails. You probably do, even though we disabled the monitor earlier (we DO want to configure alerts so that when we over-ride this to ‘ON’ for certain servers, we’ll get alerts and not have to come revisit this process)
And that’s it! The final step is to simply find your monitor in the list, and then override it to enabled for a single instance of the Windows Server Operating System class, and just pick the server you’d like to monitor for changes.
Make sure to pick ‘a Specific Object of this class’
This will let us pick a single computer to run this monitor.
Ugliest ever way to censor computer names FOUND!
Make sure to check the box to turn it on!
Then click the box for ‘Override: enabled’, and pick the over ride value of True. Finally, save it in a management pack and you’re golden!
Sources
Couldn’t have figured this out without the help of these posts!
Recently I’ve gone a bit of a blog and twitter hiatus, because the FoxDeploy family just inherited a new child-object! Born February 2nd at 2:02 AM, I had my first son!
I promise I’ve got some nice posts on the way, including the anticipated Part V of my GUI series, as well as Part V of the DSC guide…including a new tool I’ve been working on with some help from my friends in Redmond…
This is the showdown, guys. In the world of Windows tooling, which tool do we use?
In this post, we’ll cover the general benefits and pros and cons of SCCM vs DSC, and also consider GPO and MDT as well.
Plenty of people have offered their take on this, including my sempai, Declarative Configuration trailblazer and King Chef of the Realm Steven Murawski. I completely respect his opinion on the matter and encourage you to read it. Murawski – DSC Which Direction Should we Go?.
My view differs slightly from my peers in that my background is in Enterprise Client Management, and I’ve been deploying SCCM since 2011 for customers into the tens of thousands of desktops and servers.
However, I also love to code, so maybe my perspective will help the concepts gel for you.
In my mind, this debate is not really about which tool is the one-true king to use in all cases, but rather about highlighting the strengths of each and noting when they should be used. I’ll also describe how you deploy operating systems using each product as well.
It’s all about the evolution of tooling
First the Earth cooled, then we got GPO
For all practical purposes, the first true large scale management tool we had for Windows systems in the modern era was Group Policy, or GPO as it is commonly truncated. This stemmed from Local Security Policy, which is a fancy GUI to control system settings via special registry keys which are locked down from general user editing. Local Security Policy could be shared among systems in a Workgroup which was a big improvement from setting the same configuration on each system.
Then with the advent of Active Directory Domain Services, we gained the ability to organize users and computers into a hierarchy and tier the application of these same policies to craft very granular configurations of machines based on who is logging on to which computer, and where those objects were placed in the directory. Join a machine to a domain, and bam, it gets the default policy, and then you can move the computer to the right folder (or organizational Unit, OU) to put the right amount of lock-down on the node.
People used it for everything, including installing software! It was later made possible to have multiple GPOs affect a computer like you can with collections in SCCM, using WMI Filters which execute on the machine to determine which GPOs should apply, but it’s much harder to get right, and there’s no easy mechanism to view which computers would be affected.
A GPO by any other name is a registry key…
The thing about GPO is that you need to have Active Directory in place. This means Infrastructure, and suddenly, when all we wanted to do was configure certain settings across our environment, we’re now staying up late at night worrying about things like disks and server uptime and we now need a Sysadmin to run it all. Each of these steps in complexity is adding cost to the company which might not do much if anything to increase earnings.
Where GPO gets murky is that it’s kind of onerous when trying to assign multiple different sets of policy to machines based on many different conditions (imagine multiple departments, with different applications and settings for each). Additionally, it ain’t exactly quiet. In big organizations who haven’t optimized their application of policy, it’s not uncommon to see multi minute long log in times, and unconstrained Windows Update installs rebooting computers during the middle of the day.
In my day job, I still see people struggling with Group Policy, years after its release.
GPO, what is it good for?
With an Active Directory Domain, you can configure almost anything about the settings of Windows Computers, like what users are allowed to do, who is permitted to logon, setup Windows Updates and even install software. And if you have more than ten computers, you probably already have a Domain, so you kind of ‘get it for free’.
Group Policy is THE tool for configuring user experience and locking down PCs.
GPO is AWESOME for configuring desktop applications, like Microsoft Office and Chrome, and for configuring the user’s experience.
When to avoid GPO
It’s not good for installing software, it’s intrusive to users and if you mess up, it will be very public, potentially causing long log in times.
The very nature of hierarchical tiering of configuration also leads to great complexity. If you want to apply certain user settings only when they log on to particular machines it gets even harder. There are plenty of solutions, but that is some hard stuff to get right.
Additionally, it’s not great for configuring or installing server features, nor is it really made to ensure features and roles stay installed, like ensuring that IIS is installed and stays running. Etc
It’s also not lightweight, as you’ll need Domain Controllers and probably need people to run them for you, and if your organization is large, you’ll need to worry about network topology as well.
I only have AD and GPOs, what do I need to start imaging?
There is an imaging story for native Active directory tools and it involves using Windows Deployment Services to install a sysprepped image using PXE booting. This is not a good developer experience though, as we have to spend a lot of time with complex tools to save all of our imaging settings into an image, and can’t tailor the image to fit computers in certain regions, for instance.
Comparatively, SCCM and MDT allow us to we import an image from a Windows install disk and then run dozens of individual steps which are customized based on the target machines platform, model, office location and other factors. The sky is the limit.
GPO is hard, enter SCCM
To serve other configuration needs, Microsoft released their product ‘System Management Server’, which was eventually rebranded as System Center Configuration Manager.
Whereas GPO is something we get ‘for free’ when computers are a member of a domain, SCCM depends on an agent being installed on every computer you want to manage. Big difference.
This tool adds an extra level of abstraction to Active Directory, sniffing for users and computers in a domain and then allowing an SCCM admin to organize them into collections.
These are one of the defining characteristics of SCCM, these groups which can be either manually created in a drag and drop fashion, or created automatically based on common factors, like a computers distinguished name (good for organizing based on active directory OU), or users department, OS Version, etc.
If you can think of a common factor of a group of systems or people in your firm, you can target them for applications or security policies using SCCM. Collections solve the difficult problem of assigning policy based on logical placement of computers and users within AD.
SCCM excels with bare metal
You also gain the option of having cradle to grave control over systems too, as SCCM supports laying down an operating system to bare metal (industry term for brand new computers).
SCCM is easily the best imaging experience you can get with Microsoft tools. I’ve tried the other options as well, like Dell Kace (which is actually pretty good, if limited in comparison to the power of SCCM), but they’re simply not as good as SCCM.
The king of software deployment and user migration
If you’re upgrading OSes, deploying Windows Updates or software, SCCM is king. You have limitless control over how to install applications, what the user sees and doesn’t see, and most importantly of all, none of your configurations will impact their login time like GPO does. SCCM is the best at what it does.
Probably not the tool for ensuring compliance, however
SCCM DOES have a module called Desired Configuration Management, which kind of sounds like Desired State Configuration, but it relies on machines having an agent, being in a domain, etc. While you can ensure compliance with SCCM, it is a complex answer to a complex question relying on the SCCM admin to write complex tests to check for conditions and also provide remediation steps as well.
It works, but there are much easier ways to ensure system compliance than rolling SCCM.
SCCM is not lightweight
SCCM completely depends on Active Directory. All site servers (all SCCM servers) must be members of a Domain, full-stop.
This means SCCM actually adds more complexity to AD.
You need your whole AD Infrastructure, plus at least one or two likely hefty servers to run SCCM too. There is a lot of complexity in SCCM and a quick Google will show thousands of posts on the web of people asking for help with it. You’ll also need agents installed on every system you want to manage, need to pay attention to the network topology of your organization.
Finally, you will also need to be careful in your configuration, or you could nuke your whole company.
I make my living helping companies recover from SCCM disasters or get started using it the right way, and so do hundreds of my peers. It is not easy.
DSC = Easier, safer, more lightweight configuration
So long as you’re running newer operating systems, we do have another option.
Rather than needing agents on machines and infrastructure like AD (which, frankly, is very much a typical Operations or Infrastructure approach to solve the problem of machine management), we have something wholly new, birthed from our developer brothers on the other side of the glass.
I’m not going to re-explain DSC here, as I’ve already done it in a previous post, and others have as well , but there is a LOT of excitement in the industry about this notion of treating our servers like cattle. One of the biggest mobile carriers in the world operates on this premise:
Servers only ever exist in a given state. If they deviate or we make changes, we refactor and redeploy. DSC drives it all and the machine will be up and running on a new OS, with data migrated in a matter of minutes.
Microsoft was very much a ‘Fast-Follower’ in this regard, jumping onto the trail that folks like Chef and Puppet blazed, all chasing this idea of simple to read, text-file driven configuration management.
Core Benefits of DSC
In my mind, DSC excels in a few use cases:
• You need lightweight configuration for dev/test
• You need to be able to revert to old builds or test new builds quickly, with A/B testing
• You’re primarily interested in Server Management
• You want a system to be Self-healing
• You’d rather have a one-page Build config instead of a 40 page ‘runbook’ of screenshots and aren’t afraid of code.
Lightweight
DSC only requires that your target operating systems be capable of running PowerShell v4 for most features. There is no domain pre-requisite, nor do you need to worry about imaging machines. It lends itself to environments with spend in virtualization, because you can easily build a template machine on a workgroup, pre-create an admin account and save it as a template.
Need to spin up some new test machines? Fire off a few templates and then describe what you want them to do in your DSC Configuration and Apply-DSCConfiguration. After maybe one or two reboots, you’ll be good to go. No lengthy builds or service requests, process flows. Quick, fast and in a hurry.
Configuration Reversion
Since you’re describing the full build-out of your application or Service in a handfull of DSC files, and rebuilding these machines is possible very quickly, you’re now trending towards checking in your server builds themselves as artifacts in your code versioning system. No longer do you need to spend an hour or five clicking your way through wizards to get a machine or upgrade ready. Instead, you can swiftly code-test-revert-repeat until your little snowflake is perfect.
Use the built-in DSC Resources to spin up domains, users, SQL, IIS, or roll-your own scripts for the last mile of config and just pull down the version of the environment you want and hit f5.
For developers, DSC is a godsend. You can ensure that your dev/test/prod environments are the same and avoid those awkward all-IT bridge calls where people try to figure out why a simple Exchange DB Update took down e-mail for hours.
Server Management
DSC CAN manage desktops. You can also pound nails with your screwdriver.
I must say that DSC on the desktop is a bit of an afterthought, and if you want to deeply provision or lock-down your desktops, you’ll end up resorting to Local Security Policy or Group Policy, because GPO has pretty much covered everything you could ever need for desktop configuration.
Self-healing
The really beautiful thing about DSC is that when you tell a machine to ensure that something is there, it’s going to do so, and KEEP doing so. DSC is wonderful for controlling configuration drift in your environment. By default, your machine is going to verify that it is in the Desired State every fifteen minutes. This is glorious, and means that your end-users really can’t break things too badly, most of the time. If they do, DSC will heal itself in less time than it takes to go grab a coffee.
Infrastructure as Code
For one, you get to say your infrastructure is code. I mean, how cool is that?!? It’s like the future!
came up when I googled ‘infrastructure as code .gif’
For another, within about a minute, pretty much anyone can figure out what this is going to do:
This will ensure that a machine has AD Domain Services installed (basically prepping it to be a domain controller) and then make sure the RSAT tools are present as well. To walk someone through getting this configuration working in words, you might easily have a page (or three, if you’re including screenshots)
I’ve got SCCM, should i replace it with DSC?
If your company already has SCCM installed, I would direct you to make use of the investment your organization has made there, but keep in mind the opportunity to reduce complexity in your environment with Desired State Configuration.
You should consider the strengths of DSC (easy transition from dev to prod, easy rollback, store configurations in a repo, 15 minute or faster self-healing) and ask yourself these questions:
• Instead of assuming I need AD, SCCM, and GPO, what’s the minimum viable configuration I can do for this service?
• What if we didn’t have Active Directory, could this system work without it?
• Are there any features of this configuration that would benefit from being enacted and stored as Source Code, rather than an inherently wasteful ‘click-click-finish’ configuration?
Closing things out here
So I hope I’ve summed up the relative merits of each tool, and when to use them. If you think I overstate, or understate your favorite tool, let me know in the comments below.
In this post, the author posits that he can crunch numbers from the Linux command line MUCH faster than Hadoop can!
If he can do that, surely we can also beat the Hadoop Cluster…then I started wondering how I would replicate this in PowerShell, and thus this challenge was born…
This equates to ~3.5 GB, which is roughly the same data size from the original post
Be sure to only parse the first 10 folders :)
You can delete RebelSite, Twic and WorldChampionships
Iterate through all of those Chess Record files it contains(*.pgn) and parse each record out. We need to return a total count of black wins, white wins and draws. To read a PGN:
We are only interested in the results of the game, which only have 3 real outcomes. The 1-0 case means that white won, the 0-1 case means that black won, and the 1/2-1/2 case means the game was a draw. There is also a – case meaning the game is ongoing or cannot be scored, but we ignore that for our purposes.
Use solid PowerShell best practices, pipelines or whatever you want to beat the Hadoop cluster’s time of 26 minutes!
To enter
Post your comment with a link to a Github Gist or the code you used to solve this problem. Have it in by March 19th.
Winners will be determined by my decision, one from each of these categories:
Creative Coder Award- could be tersest, most ‘Dave Wyatt’, or the most dot net
Most ‘Best Practice’ award- if you’re emitting objects and embracing the teachings of Snover, you’re in the running
The So Fast Award- fastest wins, bar none
Remember, OP from the other thread did this all in a pipeline of Linux. PowerShell is all about the pipeline. So embrace it to win!
The luxurious prizes
Winners will get their pick from this pile of github and PowerShell stickers!
I’ll mail it to you unless you live in the middle of nowhere Europe and shipping will kill me.
Have your entry in by March 19th!
I’ll post my best attempt once the entries are in!
Boy oh boy,this is probably the single cause of most of the worlds Orchestrator frustration…and I think we’ve narrowed it down to a solution!
Problem
When running a runbook, you encounter strange error messages like the following.
Unexpected token ‘some string’ in expression or statement
Cause
Orchestrator runs afoul of unescaped quotes marks all the time. Simply put, if you’re running into messages like this one, look at the data in your Orchestrator pipeline for any instances of the following characters
Single quotes ‘
Double quotes ”
Backticks `
Other Windows reserved characters, like asterisks *
In our case, we were asking Orchestrator to connect to OpsMgr (SCOM), and pull the Alert Details. We decided to hunt through the details of a few of our open alerts, looking for the number ’30’. And sure enough, we found it, wrapped in quotes!
We’ve got the number in our error message AND it is in quotes. Winner winner, chicken dinner.
Solution
Especially if you’re running PowerShell scripts in Orchestrator, make sure to sanitize your inputs, and ESPECIALLY do so if you’re working with Subscribed Data.
In our case, we were unioning data from one of four different branches in our runbook, using a PowerShell script. This weird syntax you see below is parsed by SCORCH and replaced with data when the script runs
#alert could be in one of four subscribed data variable, grab them all, and only select the ones with a value
$AlertDescription = "\`d.T.~Ed/{7A0178D7-4832-42E4-89B5-CDE1D78DAA21}.ManagementGroup\`d.T.~Ed/",
             "\`d.T.~Ed/{464D77D7-C726-4391-855D-EA601A859AD0}.ManagementGroup\`d.T.~Ed/",
              "\`d.T.~Ed/{D9229F99-59FE-4F00-9274-E13A1205D388}.ManagementGroup\`d.T.~Ed/",
               "\`d.T.~Ed/{5F4E8FAA-B737-4DEB-973D-09A6C4E5D8C2}.ManagementGroup\`d.T.~Ed/" |
                 ForEach-Object {if ($_) {$_}}
Since the data being dropped in would have a double quote in it, this would break out of the string we’re defining here.
The workaround is to use here-strings to encapsulate the whole body of the string. Here-strings start with an AT Sign followed by a quote. PowerShell ignores all formatting characters within the text that follows, until it runs into a new line starting with a quote, followed by an AT sign. Like so.
@"
Put anything here, and PowerShell will respect white-space and ignore special characters, like single or double quotes
"@
We used this technique and encapsulated each of our four values in here-strings. Problem solved.
#alert could be in one of four subscribed data variable, grab them all, and only select the ones with a value
$AlertDescription = @"
\`d.T.~Ed/{7A0178D7-4832-42E4-89B5-CDE1D78DAA21}.Description\`d.T.~Ed/
"@,
@"
\`d.T.~Ed/{464D77D7-C726-4391-855D-EA601A859AD0}.Description\`d.T.~Ed/
"@,
@"
\`d.T.~Ed/{D9229F99-59FE-4F00-9274-E13A1205D388}.Description\`d.T.~Ed/
"@,
@"
\`d.T.~Ed/{5F4E8FAA-B737-4DEB-973D-09A6C4E5D8C2}.Description\`d.T.~Ed/
"@ | ForEach-Object {if ($_) {$_}}
I must say that I learned a lot about speed, and how coding structure matters when you’re going for the gold, as I was reviewing the entries from the Hadoop PowerShell challenge. The winners are at the end of this post, so zip down there to see if you won!
I’ll use the post to cover some of what we learned from the entries here! Here’s our top three tips for making your PowerShell scripts run just that much faster!
When searching through files, don’t use Get Content
As it turns out Select-String (PowerShell’s text searching cmdlet) is capable of mounting a file in memory, no need to gc it first. It’s also MUCH slimmer in memory, and has speed for days. Look at the performance difference in a common scenario, search 10 directories of files with it, and with Get-Content.
#Get-Content | Select-String example
 dir $pgnfiles | select -first 10 | get-content | Select-String "Result"

#Select-String Only example
 dir $pgnfiles | select -first 10 | Select-String "Result"

Testing GC | Select-String...3108.5527 MS
Testing Select-String Only...99.1534   MS
Using Select-String alone is a 31x Speed Increase! This is pretty much a no-brainer. If you need to look inside of files, definitely dump your Get-Content steps. Credit goes to Chris Warwick for this find.
@mrhvid@IISResetMe@FoxDeploy Drop the "Get-Content" – that's gonna kill you. Just run Select-String on the files directly, *much* quicker
#init my collection
$collection = @()

ForEach ($file in $pgnfiles) {

  $collection += $file | Select-String "Result"

 }

 $collection
This structure sets up a ‘master list’, then gets a glob of objects, iterate through them, do some stuff and add a new entry to a master list. At the end, display the list.
Why shouldn’t I do this?
PowerShell is based off of dotnet and some dotnet variable types including our beloved string and array are immutable. . This means that PowerShell can’t simply tack your entry to the end of $collection, like you’d think.
No, instead PowerShell has to make a new variable equal to the whole of the old one, add our new entry to the end, and then throws away the old variable. This has almost no impact on small datasets, but look at the difference when we go through 100k GUID here!
Sixty times faster!!! The really crazy part, you can watch PowerShell’s RAM usage jump all over the place, as it doubles up the variable in memory, commits it, and then runs GarbageCollection. Watch how the RAM keeps doubling, then halfing!
I didn’t actually think it would be this dramatic!
How do I not use $collection += structure in my code?
Array list will be your new best friend. In one project we were migrating customers from two different remote desktop systems into one with some complex powershell code. There was a section of the code which built a list of all of there files and omitting certain ones. When we swapped out $string += for array list, we dropped out execution time from six minutes to only 20 seconds! A huge performance boost with this one tip!
Array list is a bit different from a regular string here’s how you do it. First you have to make a new array list (which developers call instantiating an instance of a class =i felt so cool typing that), like so:
Next, we iterate through each object, and check out how we add them to our collection. We call the ArrayLists .Add() method, instead of using the += syntax. Finally at the end, we get the whole list back out by using return, or just putting the variable name in again.
You might notice when you run this that you see something like this:
Ohhh, so many numbers
ArrayList is a bit weird. when you add an entry to it, ArrayList responds back with the index position of the new item you added. In some use case in the world, this might be helpful, but not really to us. So, we just pipe our .Add() statement into null, like so:
$collection.Add($result) | Out-Null
Some people put [void] on the front of the line instead, I try to avoid it, seems confusing and very ‘developery’ too me.
The fastest way to read a file, stream reader
I was simply astounded to see the tremendous speed difference between using PowerShell’s Get-Content cmdlet versus the incredibly fast StreamReader.
Here’s why Get-Content can be a bit slow. When you’re running Get-Content, or Select-String, PowerShell is reading the whole file into memory at once. It parses it and dumps out a object for each line in the file, sending it on down the pipeline for processing.
When we’re working with large files, or lots of small files, we have a better, option, and that is the StreamReader from .Net. It IS fundamentally different in how it presents the content from the file, so here’s a comparison.
#Working with Get-Content

#Read our file into File
$file = Get-Content $fullname

#Step through each line
foreach ($line in $file){
    #Do something with our line here
    #ex:
    if($line -like "[Re*")
       {
       $results[$line]+=1
       }
}
And now, with StreamReader
#Same concept but with StreamReader

#Setup a streamreader to process the file
$file = New-Object System.IO.StreamReader -ArgumentList $Fullname

:loop while ($true )
{
    #Read this line
    $line = $file.ReadLine()
    if ($line -eq $null)
    {
        #If the line was $null, we're at the end of the file, let's break
        $file.close()
        break loop
    }
    #Do something with our line here
    if($line.StartsWith('[Re'))
        {
        $results[$line]+=1
        }

}
So, now that you’ve seen how it works, how much faster and better is it?
Speed results
The numbers speak for themselves
Method
Time
Get-Content
3562 MS
StreamReader
133 MS
StreamReader is 26 times faster!
Man, I wish someone would make a PowerShell snippet for StreamReader
Me too! So here you go. Load this into the ISE and you’re set.
$snippet = @{
    Title = 'StreamReader Snippet'
    Description = 'Use this to quickly have a working StreamReader'
    Text = @"
    $fullname = #FilePathHere
begin
    {
        $results = @{}
    }

    process
    {
        $file = New-Object System.IO.StreamReader -ArgumentList $Fullname

        :loop while ($true )
        {
            $line = $file.ReadLine()
            if ($line -eq $null)
            {
                $file.close()
                break loop
            }
            if($line.StartsWith('[Re'))
            {
                #do something with the line here
                $results[$line]+=1
            }
        }
    }
    end
    {
        return $results
    }
}
"@
}
New-IseSnippet @snippet
Taking out your own Trash – This cool tip comes to us from Kevin Marquette. If PowerShell has some monster objects in memory, or you just want to clean things up, you can call a System Garbage Collection method to take out your trash, like so:
[GC]::Collect()
True Speed, going native – The fastest of the fast approaches used native c# code which powershell has supported since v 3. Using this, you gain a whole slew (that’s a technical term) of new dotnet goodness to play with. For examples of this technique, check out what Tore, Oysind and Mathias did.
Can PowerShell beat Linux, or Hadoop for that matter?
[using Amazon Web Services hosting…] with 7 x c1.medium machine[s] in the cluster took 26 minutes…processing data at ~ 1.14MB/sec
All of these entrants can proudly say that their code DID beat the Hadoop cluster. Boe Prox , Craig Duff, Martin Pugh, /u/evetsleep /u/Vortex100 and kevin Marquette, Irwin Strachan, Flynn Bundy, David Kuehn, and /u/LogicalDiagram from Reddit, and @IisResetme! All eleven averaged a minimum of 10.76 MB/sec. Their code all completed in less than six minutes, much faster than the 26 minutes of the mighty seven node Hadoop cluster!
But can PowerShell beat Linux?
When I saw that Adam Drake, a master of the Linux command line and Bash tools, was able to process all of the results in only 11 seconds, I knew this was a tall order. We gave it our all guys, there’s no shame in…BEATING that time!
gAmazingly, our two Speed Demons, Tore Groneng, and Øvind Kallstad, working in conjunction with Mathias Jensen, turned in a blazing fast time of eight seconds, each! To be specific, Øvind’s time was 8,778 MS, while Tore beat that by an additional 200 MS. This represents a data throughput of 411.75 MB/s! This is close to the maximum speed of my all SSD Raid-0, so they REALLY turned in quite a result!
360 times faster than the Hadoop cluster. Astounding!
Winners!
I’m now pleased to announce the winners of the Hadoop contest. I was so impressed with the entries that I decided to pick a bonus fourth winner.
Speed King Winner – This one goes to Tore Groneng. He worked closely with Mathias Jensen, and turned out an incredible 8 second total execution. For comparison, this is a 200x speed increase over the results of the Hadoop Cluster from our original challenge. He should be proud.
A close runner-up was Øvind Kallstad, with a very honorable time of 8778 MS.
Most Best Practice Award – This one goes to Boe Prox, with a textbook perfect entry, including object creation, runspaces, and just plain pretty code.
Regex God – This award goes to Craig Duff, who blew my socks off with his impressive Regex skills!
One-liner Champion – This award was well earned by Flynn Bundy, who managed to turn out a very respectable time of two minutes, and did it all in a one-liner! His code ALMOST fits in a single, tweet, in fact! Only 216 characters!
If your name is mentioned here, send me a DM and we’ll work out getting you your hard-earned stickers
Back with the release of Office ’97 in November of 1996, Microsoft introduced a beloved new helper tool to assist users in navigating through the daunting changes in Microsoft Office,
Microsoft Clippy!
Copyright : Microsoft
Clippy was wildly beloved by end-users and IT Professionals alike, just checkout it’s many accomplishments!
Smithsonian Magazinecalled Clippy “one of the worst software design blunders in the annals of computing”.[16]Time magazine included Clippy in a 2010 article listing fifty worst inventions.[17]
For too many years, Clippy has gone missing in Windows, and admins were left with horrible solutions, like sending e-mails or talking to their users face-to-face.
But now he’s back!
I am proud to share with you my newest slap-dash project, ‘Invoke-Clippy!‘
Clippy, how I’ve missed you!
Today, it pretty much just pops up the familiar character. Being a very lazy retreading of Chrissy’s code from her ‘Hey Scripting Guy’ article, it also features the PowerShell logo in the system tray to end the code! AND it runs hidden!
You have the option of specifying -Button1 or -Button2 to add additional buttons. If you’d like the buttons to do anything, add some code for them to the empty script blocks on line 71 and line 80.
Consider this a framework to use to annoy–, er notify your coworkers with helpful reminders.
Suggestions
Scheduled Task on your coworkers machine every 15 minutes to remind them to check the ticket queue
Add two buttons, and make the second button spawn another instance of Clippy (consider reversing the X,Y values to make Clippy appear on the other side)
Use this as a nice and professional way to communicate mandatory reboots to your end users
No matter what you come up with, share it with the class! Did you find a way to make this appear interactively on a remote session? Did you add -ComputerName support (If you did, AWESOME!).
Either comment here or make your own fork and send me a Pull Request. I’d love to see what you come up with.
Today, I woke up to a nasty error in the FoxDeploy Hyper-V lab. All of my VMs were stopped, and wouldn’t start! When I tried to start one, I’d see this error:
An error occurred while attempting to start the selected virtual machines: General Access Denied Error…
VMName: Account does not have permission to open attachment <PathToVHD>
In my case, this happened because I have a Raid of SSDs for maximum IOPs for my VMs (can’t stand something being slow!) and I lost a drive. Somehow in rebuilding the volume, permissions were lost for some items on the drive, in addition to corrupting my Recycle Bin.
Symptom
Can’t start any pre-existing VMs but are able to make a new one.
Cause
Something is wrong with permissions (namely, the VM doesn’t have Full Control rights to it’s VHD anymore. In this image below, you can see a new and working VM on the left, and a broken VM on the right. Note the missing VMid entry.
Fix
You could fix this by hand by getting the VMId of the VM and adding it with Full Control permissions manually. I didn’t like this approach because some of my VMs have more than one VHD (like my SCOM VM, six VHDs!), and I’ve got 8 VMs anyway. Way too much work!
All we need to do is get a list of our VMs, then iterate through each disk and apply the right Full Control perms. This depends on the NTFS Security Module being installed. If you’re running PowerShell v4 or higher, it will attempt to install the module for you. If not, download and install it first.
Code
#Import the NTFSSecurity Module, if not available, prompt to download it
If ((Get-Module).Name -notcontains 'NTFSSecurity'){
    Write-Warning "This script depends on the NTFSSecurity Module, by MSFT"
        if ($PSVersionTable.PSVersion.Major -ge 4){
            Write-Output "This script can attempt to download this module for you..."
            $DownloadMod = Read-host "Continue (y/n)?"

            if ($DownloadMod.ToUpper() -like "Y*"){
                find-module NTFSSecurity | Install-Module
                }
                else{
                #User responded No, end
                Write-Warning "Please download the NTFSSecurity module and continue"
                break
            }

        }
        else {
            #Not running PowerShell v4 or higher
            Write-Warning "Please download the NTFSSecurity module and continue"
            break
        }
    }
    else{
    #Import the module, as it exists
    Import-Module NTFSSecurity

    }

$VMs = Get-VM
ForEach ($VM in $VMs){
    $disks = Get-VMHardDiskDrive -VMName $VM.Name
    Write-Output "This VM $($VM.Name), contains $($disks.Count) disks, checking permissions..."

        ForEach ($disk in $disks){
            $permissions = Get-NTFSAccess -Path $disk.Path
            If ($permissions.Account -notcontains "NT Virtual Mach*"){
                $disk.Path
                Write-host "This VHD has improper permissions, fixing..." -NoNewline
                 try {
                      Add-NTFSAccess -Path $disk.Path -Account "NT VIRTUAL MACHINE\$($VM.VMId)" -AccessRights FullControl -ErrorAction STOP
                     }
                catch{
                       Write-Host -ForegroundColor red "[ERROR]"
                       Write-Warning "Try rerunning as Administrator, or validate your user ID has FullControl on the above path"
                       break
                     }

                Write-Host -ForegroundColor Green "[OK]"

            }

        }
}
And here it is in action.
After working, I’m now able to launch my VMs again!
Note: if you’ve got a lot of differencing or template disks in your environment, you’ll also need to resolve the parentpath for each disk, if it exists. I’d recommend using this fine code by Sam Boutrous, Get-ParentPath.